本文简单的分析一下vue从初始化到完成渲染的流程,重点还是在于响应式的分析,生命周期函数简单带过。
以下代码均经过不同程度的精简
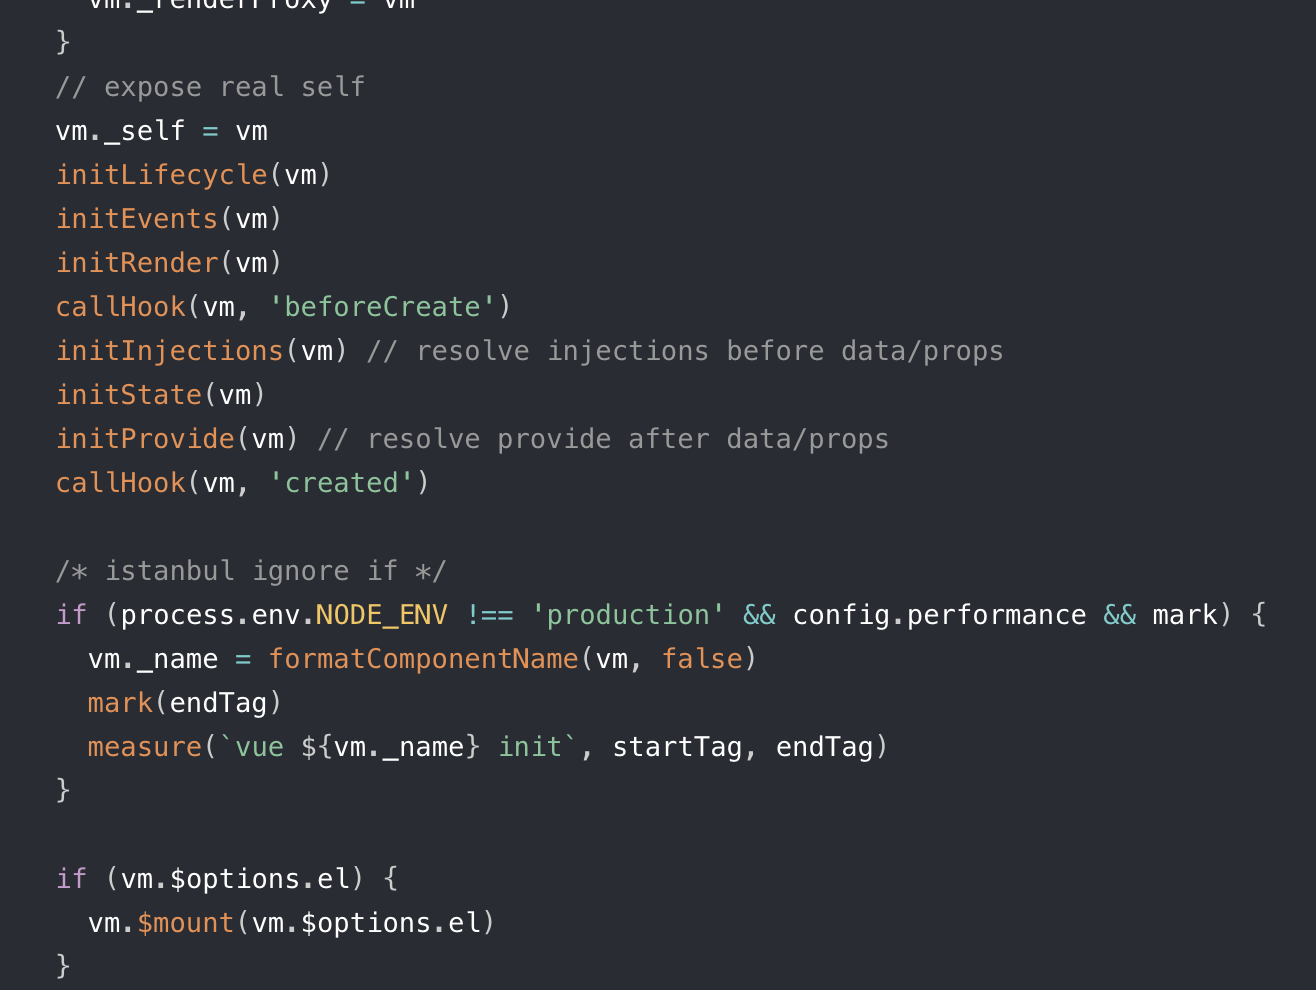
vue.init 1 2 3 4 5 6 7 8 9 10 11 12 13 14 15 16 17 18 19 20 21 22 23 Vue.prototype._init = function(options) { vm.$options = mergeOptions( // 合并options resolveConstructorOptions(vm.constructor), options || {}, vm ) // ... initLifecycle(vm) // 开始一系列的初始化 initEvents(vm) initRender(vm) callHook(vm, 'beforeCreate') //执行 beforeCreate 钩子 initInjections(vm) initState(vm) // observe initProvide(vm) callHook(vm, 'created') //执行 created 钩子 // ... // 挂载dom if (vm.$options.el) { // 可以认为是运行了 mountComponent vm.$mount(vm.$options.el) } }
其实上述代码已经包含了整个生命周期的行为,简要分析一下函数所做的事情
初始化到created 首先,将用户提供的options对象,父组件定义在子组件上的event、props(子组件实例化时),vm原型方法,和Vue构造函数内置的选项合并成一个新的options对象,赋值给vm.$options。
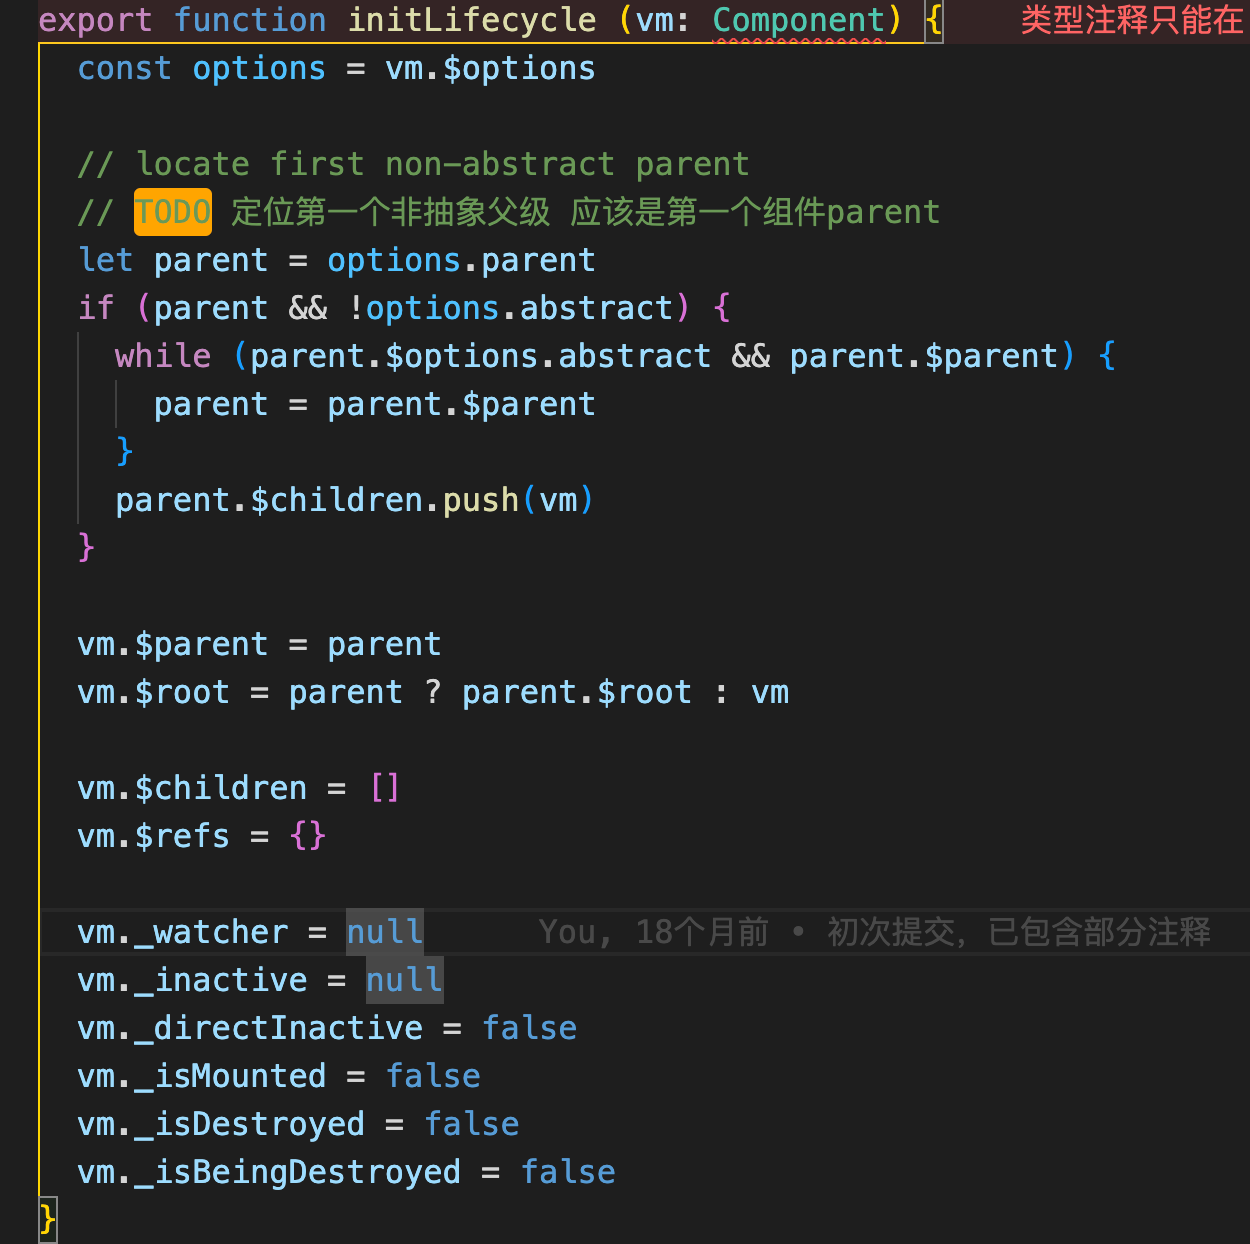
initLifecycle(vm) : 主要作用是确认组件的父子关系(定位非抽象父级)和初始化某些实例属性。找到父组件实例赋值给vm.$parent,将自己push给父组件的$children;
initEvents(vm) : 主要作用是将父组件使用v-on或@注册的自定义事件添加到子组件的私有属性vm._events中;
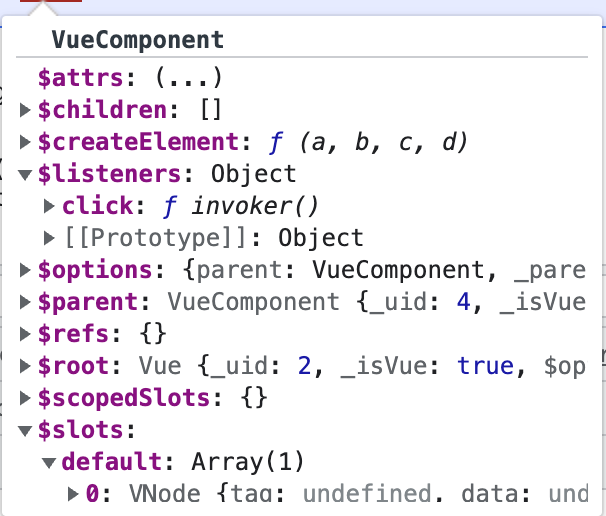
initRender(vm) : 主要作用是初始化用来将render函数转为vnode的方法vm.$createElement。用户自定义的render函数的参数h就是vm.$createElement方法,它可以返回vnode。此阶段还会进行$attrs $listeners $slots $scopedSlots的处理
等以上操作全部完成,就会执行beforeCreate钩子函数,此时用户可以在函数中通过this访问到vm.$parent和vm.$createElement $attrs $listeners $slots $scopedSlots等有限的属性和方法。
触发beforeCreate
initInjections(vm) : 初始化inject,使得vm可以访问到对应的依赖;
initState(vm) : 初始化会被使用到的状态,状态包括props,methods,data,computed,watch五个选项。调用相应的init方法,使用vm.$options中提供的选项对这些状态进行初始化,其中initData方法会调用observe(data, true),实现对data中属性的监听,实际上是使用Object.defineProperty方法定义属性的getter和setter方法 ;
Computed 和 watch 初始化 会创建computed-watch和user-watch
**initProvide(vm)**:初始化provide,使得vm可以为子组件提供依赖。
这 3 个初始化方法先初始化inject,然后初始化props/data状态,最后初始化provide,这样做的目的是可以在props/data中使用inject内所注入的内容。等以上操作全部完成,就会执行created钩子函数,此时用户可以在函数中通过this访问到vm中的props,methods,data,computed,watch和inject等大部分属性和方法。
触发created
beforeMouted到mouted 此阶段即是vm.$mount(vm.$options.el)过程
1 2 3 4 5 6 7 8 9 10 11 12 13 14 15 16 17 18 19 20 21 22 运行时版本: Vue.prototype.$mount = function(el) { // 最初的定义 return mountComponent(this, query(el)); } 完整版: const mount = Vue.prototype.$mount Vue.prototype.$mount = function(el) { // 拓展编译后的 var options = this.$options; if(!options.render) { if(options.template) { ... //一些判断 } else if (el) { //传入的 el 选项不为空 options.template = getOuterHTML(el); } if (options.template) { options.render = compileToFunctions(template, ...).render //将 template 编译成 render 函数 } } ... return mount.call(this, query(el)) //即 Vue.prototype.$mount.call(this, query(el)) }
在完整版的vm.$mount方法中,如果用户未提供render函数,就会将template或者el.outerHTML编译成render函数。然后会执行mountComponent函数:
mountComponent如下:
1 2 3 4 5 6 7 8 9 10 11 12 13 14 15 16 17 18 19 20 21 22 23 24 25 26 27 28 29 30 31 32 33 34 35 36 37 38 39 40 41 42 43 44 45 46 47 48 49 50 51 52 53 54 55 56 57 58 59 60 61 62 63 64 65 66 67 68 69 70 71 72 73 export function mountComponent( vm, el, hydrating ) { vm.$el = el if (!vm.$options.render) { vm.$options.render = createEmptyVNode if (process.env.NODE_ENV !== 'production') { /* istanbul ignore if */ if ((vm.$options.template && vm.$options.template.charAt(0) !== '#') || vm.$options.el || el) { warn( 'You are using the runtime-only build of Vue where the template ' + 'compiler is not available. Either pre-compile the templates into ' + 'render functions, or use the compiler-included build.', vm ) } else { warn( 'Failed to mount component: template or render function not defined.', vm ) } } } callHook(vm, 'beforeMount') let updateComponent /* istanbul ignore if */ if (process.env.NODE_ENV !== 'production' && config.performance && mark) { updateComponent = () => { const name = vm._name const id = vm._uid const startTag = `vue-perf-start:${id}` const endTag = `vue-perf-end:${id}` mark(startTag) const vnode = vm._render() mark(endTag) measure(`vue ${name} render`, startTag, endTag) mark(startTag) vm._update(vnode, hydrating) mark(endTag) measure(`vue ${name} patch`, startTag, endTag) } } else { updateComponent = () => { vm._update(vm._render(), hydrating) } } // updateComponent 函数包括vnode生成及挂载到真实dom // 生成一个watcher实例,updateComponent作为watcher函数的回调 new Watcher(vm, updateComponent, noop, { before () { if (vm._isMounted) { callHook(vm, 'beforeUpdate') } } }, true /* isRenderWatcher */) hydrating = false // 挂载完成后 运行mouted if (vm.$vnode == null) { // actived 需要判断组件已经加载过了 vm._isMounted = true callHook(vm, 'mounted') } return vm }
在完整版的vm.$mount方法中,如果用户未提供render函数,就会将template或者el.outerHTML编译成render函数。然后会执行mountComponent函数:如果用户提供了el选项,则会获取用于挂载的真实节点,将此节点赋值给vm.$el属性。
触发beforeMount
在mountComponent方法中,会实例化一个watcher,watcher执行完内部逻辑后(响应式关键) ,执行updateComponent方法将vm._render()返回的vnode挂载到真实节点中
1 2 3 4 5 6 7 8 9 10 11 12 13 14 15 16 17 18 19 // 生成一个watcher实例,updateComponent作为watcher函数的回调 new Watcher(vm, updateComponent, noop, { before () { if (vm._isMounted) { callHook(vm, 'beforeUpdate') } } }, true /* isRenderWatcher */) updateComponent = () => { vm._update(vm._render(), hydrating) } Vue.prototype._render = function() { const vm = this const { render } = vm.$options const vnode = render.call(vm, vm.$createElement) return vnode }
至此vue的生命周期就结束了,下面重点介绍 mountComponent 实例化watcher发生了什么
依赖收集 再讲解依赖收集之前,我们需要先了解,Object.defineProperties是什么时候设置的
observer initState阶段,vue会针对对象数据类型进行observer函数处理,方法的作用就是给非 VNode 的对象类型数据添加一个Observer类
举个例子, 下面的data 会有6次observer处理,会有6个Observer类
1 2 3 4 5 6 7 8 9 10 11 12 13 14 15 16 data = { a: 1, b: 2, c: [1, 2, {a: 1}], d: { a: { b: 1 } } } data 一次 c 一次 c {a:1} 一次 d 一次 a 一次 b 一次
Observer会递归处理对象类型,有一个dep实例属性,用处在 defineReactive 中 childOb.dep.depend(),(父对象变化会影响子对象)
Observer的主要目的是对对象进行遍历并定义getter和setter,这也是依赖收集的基础,逻辑在函数 defineReactive 中
1 2 3 4 5 6 7 8 9 10 11 12 13 14 15 16 17 18 19 20 21 22 23 24 25 26 27 28 29 30 31 32 33 34 35 36 37 38 39 40 41 42 43 44 45 export class Observer { value: any; dep: Dep; vmCount: number; // number of vms that have this object as root $data constructor (value: any) { this.value = value this.dep = new Dep() // 在 defineReactive 中 childOb.dep.depend() this.vmCount = 0 // vm._Data.__ob__ 指向这个Observer def(value, '__ob__', this) if (Array.isArray(value)) { if (hasProto) { protoAugment(value, arrayMethods) } else { copyAugment(value, arrayMethods, arrayKeys) } this.observeArray(value) } else { this.walk(value) } } /** * Walk through all properties and convert them into * getter/setters. This method should only be called when * value type is Object. */ walk (obj: Object) { const keys = Object.keys(obj) for (let i = 0; i < keys.length; i++) { defineReactive(obj, keys[i]) } } /** * Observe a list of Array items. */ observeArray (items: Array<any>) { for (let i = 0, l = items.length; i < l; i++) { observe(items[i]) } } }
defineReactive
1 2 3 4 5 6 7 8 9 10 11 12 13 14 15 16 17 18 19 20 21 22 23 24 25 26 27 28 29 30 31 32 33 34 35 36 37 38 39 40 41 42 43 44 45 46 47 48 49 50 51 52 53 54 55 56 57 58 export function defineReactive ( obj: Object, key: string, val: any, customSetter?: ?Function, shallow?: boolean ) { const dep = new Dep() const property = Object.getOwnPropertyDescriptor(obj, key) if (property && property.configurable === false) { return } // cater for pre-defined getter/setters const getter = property && property.get const setter = property && property.set if ((!getter || setter) && arguments.length === 2) { val = obj[key] } let childOb = !shallow && observe(val) Object.defineProperty(obj, key, { enumerable: true, configurable: true, get: function reactiveGetter () { const value = getter ? getter.call(obj) : val if (Dep.target) { dep.depend() if (childOb) { childOb.dep.depend() if (Array.isArray(value)) { dependArray(value) } } } return value }, set: function reactiveSetter (newVal) { const value = getter ? getter.call(obj) : val /* eslint-disable no-self-compare */ if (newVal === value || (newVal !== newVal && value !== value)) { return } /* eslint-enable no-self-compare */ if (process.env.NODE_ENV !== 'production' && customSetter) { customSetter() } if (setter) { setter.call(obj, newVal) } else { val = newVal } childOb = !shallow && observe(newVal) dep.notify() } }) }
这里需要注意函数每次运行都会实例化一个dep,getter 和 setter都是针对dep做出了处理
Dep 1 2 3 4 5 6 7 8 9 10 11 12 13 14 15 16 17 18 19 20 21 22 23 24 25 26 27 28 29 30 31 32 33 34 35 36 37 38 39 40 41 42 43 44 45 46 export default class Dep { static target: ?Watcher; id: number; subs: Array<Watcher>; constructor () { this.id = uid++ this.subs = [] } addSub (sub: Watcher) { this.subs.push(sub) } removeSub (sub: Watcher) { remove(this.subs, sub) } depend () { if (Dep.target) { // watcher addDep // 简单来说 就是一个watcher dep 互相持有的过程 Dep.target.addDep(this) } } notify () { // stabilize the subscriber list first const subs = this.subs.slice() if (process.env.NODE_ENV !== 'production' && !config.async) { // subs aren't sorted in scheduler if not running async // we need to sort them now to make sure they fire in correct // order subs.sort((a, b) => a.id - b.id) } for (let i = 0, l = subs.length; i < l; i++) { subs[i].update() } } } // The current target watcher being evaluated. // This is globally unique because only one watcher // can be evaluated at a time. Dep.target = null const targetStack = []
Dep 实际上就是对 Watcher 的一种管理,Dep 脱离 Watcher 单独存在是没有意义的,主要看一下depend和notify
Watcher 上一节我们提到在mountComponent 函数中实例化了一个**render watcher** 实例,现在来重点分析一下。
render watcherrender watcher** ,每个组件有且仅有一个render watch
首先看一下watcher的代码
1 2 3 4 5 6 7 8 9 10 11 12 13 14 15 16 17 18 19 20 21 22 23 24 25 26 27 28 29 30 31 32 33 34 35 36 37 38 39 40 41 42 43 44 45 46 47 48 49 50 51 import { pushTarget, popTarget } from './dep' ;let uid = 0 export class Watcher { constructor ( this .deps = [] this .newDeps = [] this .depIds = new Set () this .newDepIds = new Set () this .id = uid++ this .value = this .get () } get () { pushTarget (this ) if (this .deep ) { traverse (value) } popTarget () this .cleanupDeps () return value } addDep (dep) { const id = dep.id if (!this .newDepIds .has (id)) { this .newDepIds .add (id) this .newDeps .push (dep) if (!this .depIds .has (id)) { dep.addSub (this ) } } } update ( console .log ("接受到更新消息" ); queueWatcher (this ); } run ( } }
首先实例化wather会运行get函数中的pushTaget
1 2 3 4 5 6 7 8 9 pushTarget (this )
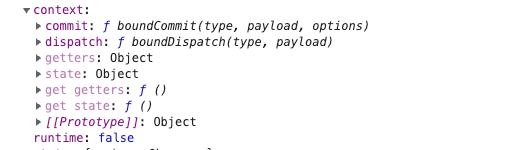
首先说明,Dep.target 和 targetStack 均为全局属性
实际上就是把 Dep.target 赋值为当前的渲染 watcher (貌似一个实例仅有一个) 并压栈(为了恢复用,vue3中是为了满足嵌套watch)。接着又执行了:
1 value = this .getter .call (vm, vm)
this.getter 对应就是 updateComponent 函数,这实际上就是在执行:
1 vm._update (vm._render (), hydrating)
它会先执行 vm._render() 方法,因为之前分析过这个方法会生成 渲染 VNode,并且在这个过程中会对 vm 上的数据访问,这个时候就触发了数据对象的 getter。
那么每个对象值的 getter 都持有一个 dep,在触发 getter 的时候会调用 dep.depend() 方法,也就会执行Dep.target.addDep(this)。
刚才我们提到这个时候 Dep.target 已经被赋值为渲染 watcher,那么就执行到 addDep 方法:
1 2 3 4 5 6 7 8 9 10 addDep (dep : Dep ) { const id = dep.id if (!this .newDepIds .has (id)) { this .newDepIds .add (id) this .newDeps .push (dep) if (!this .depIds .has (id)) { dep.addSub (this ) } } }
这时候会做一些逻辑判断(保证同一数据不会被添加多次)后执行 dep.addSub(this),那么就会执行 this.subs.push(sub),也就是说把当前的 watcher 订阅到这个数据持有的 dep 的 subs 中,这个目的是为后续数据变化时候能通知到哪些 subs 做准备。
所以在 vm._render() 过程中,会触发所有数据的 getter,这样实际上已经完成了一个依赖收集的过程。那么到这里就结束了么,其实并没有,在完成依赖收集后 ,还有几个逻辑要执行,首先是:
1 2 3 if (this .deep ) { traverse (value) }
这个是要递归去访问 value,触发它所有子项的 getter,这个之后会详细讲。接下来执行:
popTarget 的定义在 src/core/observer/dep.js 中:
1 Dep .target = targetStack.pop ()
实际上就是把 Dep.target 恢复成上一个状态,因为当前 vm 的数据依赖收集已经完成,那么对应的渲染Dep.target 也需要改变。最后执行:
其实很多人都分析过并了解到 Vue 有依赖收集的过程,但我几乎没有看到有人分析依赖清空的过程,其实这是大部分同学会忽视的一点,也是 Vue 考虑特别细的一点。
1 2 3 4 5 6 7 8 9 10 11 12 13 14 15 16 17 cleanupDeps () { let i = this .deps .length while (i--) { const dep = this .deps [i] if (!this .newDepIds .has (dep.id )) { dep.removeSub (this ) } } let tmp = this .depIds this .depIds = this .newDepIds this .newDepIds = tmp this .newDepIds .clear () tmp = this .deps this .deps = this .newDeps this .newDeps = tmp this .newDeps .length = 0 }
考虑到 Vue 是数据驱动的,所以每次数据变化都会重新 render,那么 vm._render() 方法又会再次执行,并再次触发数据的 getters,所以 Watcher 在构造函数中会初始化 2 个 Dep 实例数组,newDeps 表示新添加的 Dep 实例数组,而 deps 表示上一次添加的 Dep 实例数组。
在执行 cleanupDeps 函数的时候,会首先遍历 deps,移除对 dep.subs 数组中 Wathcer 的订阅,然后把 newDepIds 和 depIds 交换,newDeps 和 deps 交换,并把 newDepIds 和 newDeps 清空。
那么为什么需要做 deps 订阅的移除呢,在添加 deps 的订阅过程,已经能通过 id 去重避免重复订阅了。
考虑到一种场景,我们的模板会根据 v-if 去渲染不同子模板 a 和 b,当我们满足某种条件的时候渲染 a 的时候,会访问到 a 中的数据,这时候我们对 a 使用的数据添加了 getter,做了依赖收集,那么当我们去修改 a 的数据的时候,理应通知到这些订阅者。那么如果我们一旦改变了条件渲染了 b 模板,又会对 b 使用的数据添加了 getter,如果我们没有依赖移除的过程,那么这时候我去修改 a 模板的数据,会通知 a 数据的订阅的回调,这显然是有浪费的。
因此 Vue 设计了在每次添加完新的订阅,会移除掉旧的订阅,这样就保证了在我们刚才的场景中,如果渲染 b 模板的时候去修改 a 模板的数据,a 数据订阅回调已经被移除了,所以不会有任何浪费,真的是非常赞叹 Vue 对一些细节上的处理。
代码反推 首先看vue文件,
data包含三个数据,其中一个是对象类型
computed有一个,依赖于data1,data2
wather有一个,依赖于data1
1 2 3 4 5 6 7 8 9 10 11 12 13 14 15 16 17 18 19 20 21 22 23 24 25 26 27 28 29 30 31 32 33 34 35 36 37 38 39 40 41 42 43 <template> <div class="home"> <p>{{data1}}</p> <span>{{data2}}</span> <div>{{data3.a}}</div> <a href="">{{com1}}</a> </div> </template> <script> // @ is an alias to /src import SlopScope from '@/components/slotScope.vue' export default { name: 'Home', data() { return { data1: 1, data2: 2, data3: { a: "1sdfds", b: "fasaga" } } }, methods: { }, mounted() { console.log("mounted"); console.log(this); }, computed: { com1(){ return this.data1 + this.data2 } }, watch: { data1() { console.log(111111); } } } </script>
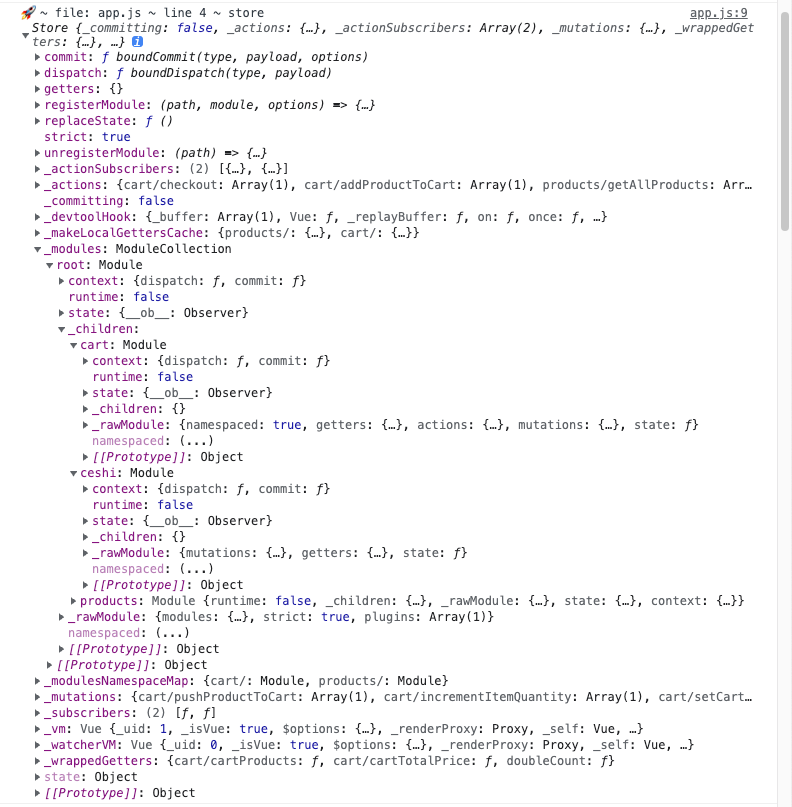
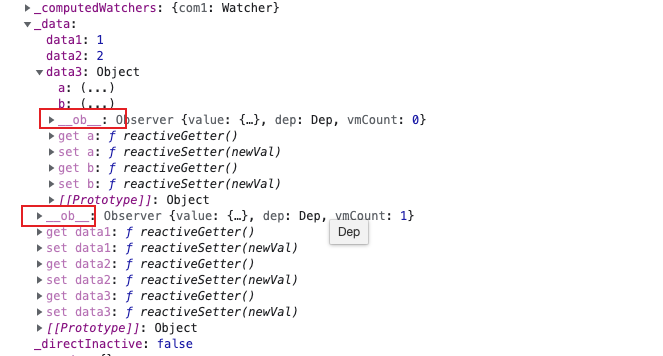
我们在控制台打印一下vm,先看一下_data,可见每一个对象类型均持有一个__ob__即Oberver实例
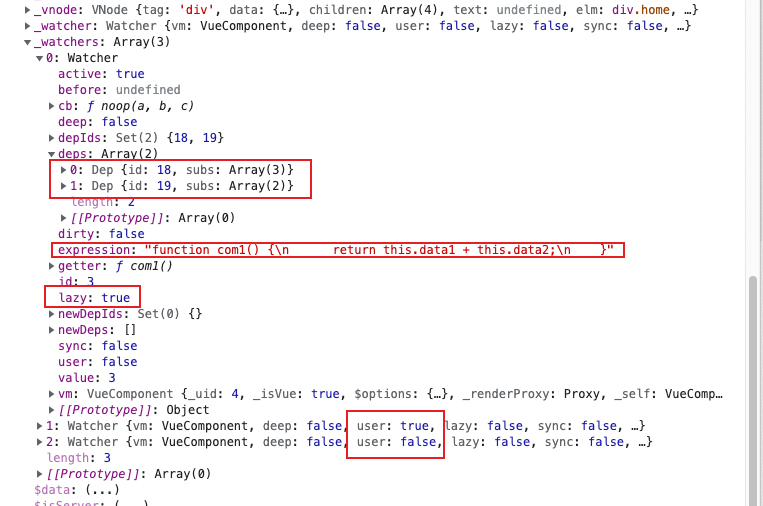
然后看一下water,其中有两个watcher相关的属性
_watcher属性指向的就是render watcher,每个组件有且仅有一个(真实渲染到页面上的)
_wathers属性是组件相关的所有watcher
一个render watcher 就是 _watcher指向的那个
一个computed watcher 可以看到属性中 lazy = true
一个user watcher 可以看到属性 user = true
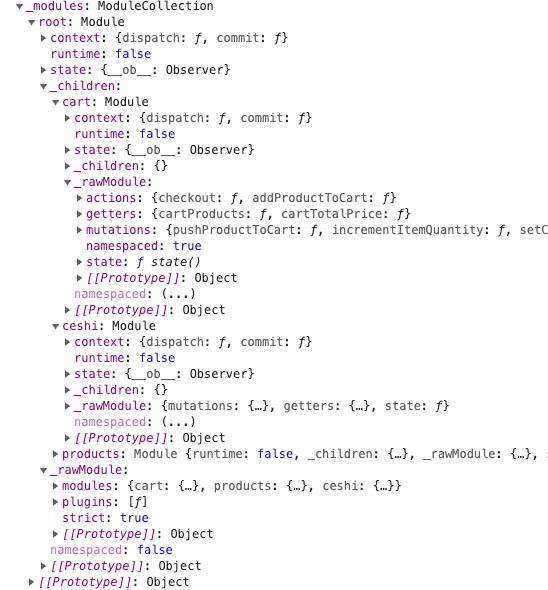
我们再重点关注一下computed watcher中的deps
其中一个是data1对应的dep,subs存在三个watcher,对应render user computed
还有一个是data2对应的dep,subs存在二个watcher,对应render computed
// TODO 为什么根data的__ob__持有的dep没有关联的watcher,也没有watcher关联它
总结 根据自己的理解,进行一个简短的总结,方便理解记忆
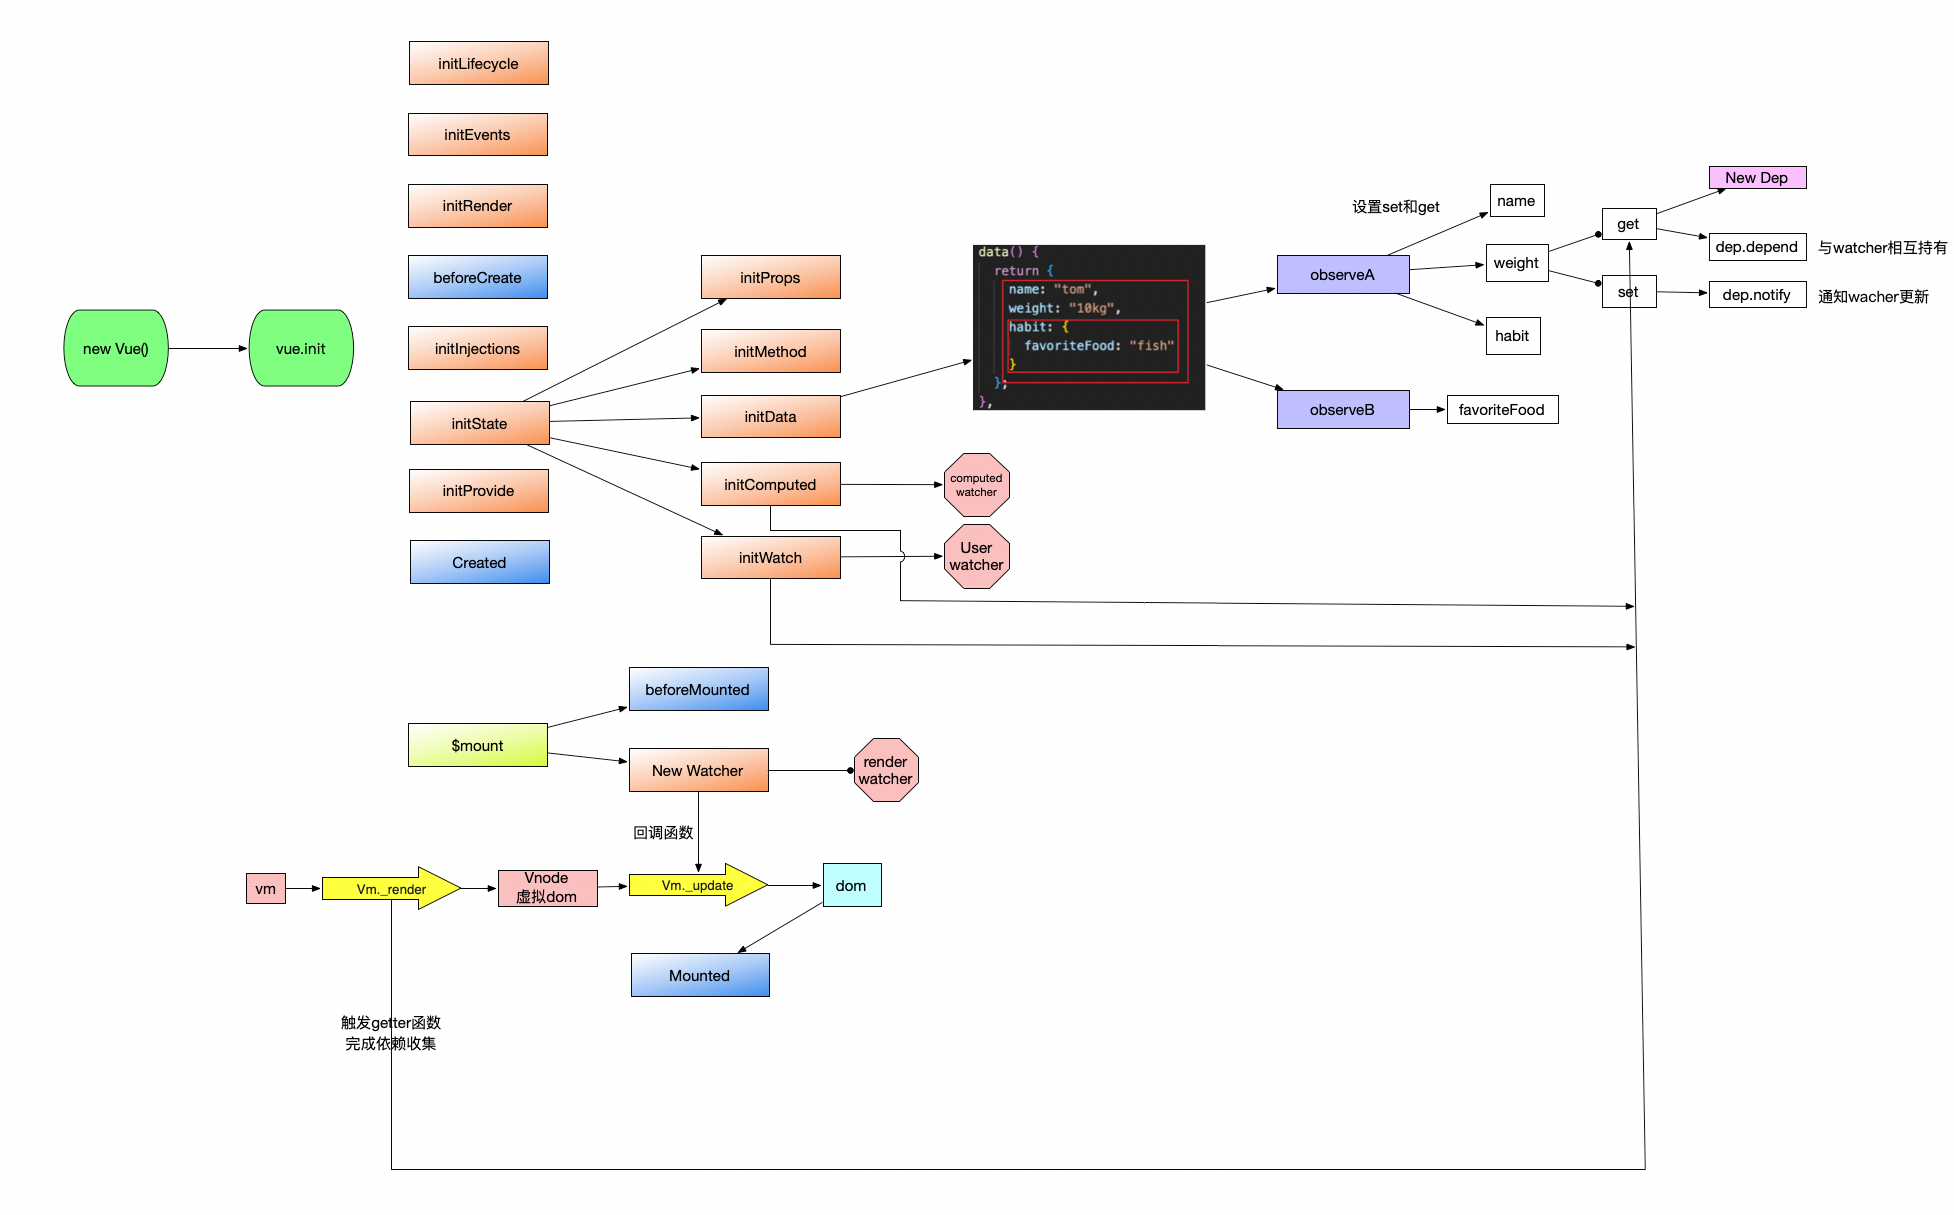
vue在init阶段中的initData
initProps(vm, opts.props) 对prop进行defineReactive设置set和get
initMethods(vm, opts.methods)
initData(vm) 对data进行初始化,针对对象类型进行递归处理,使用observer函数处理
initComputed 针对每个computed生成一个对应的watcher,并在访问get函数时触发依赖收集
initWatch(vm, opts.watch) 生成user watcher,并完成依赖收集
每一个observer函数,都会实例化一个Observer实例,挂载到对象类型的__ob__上
Observer在实例化的过程中,会针对对象的每一个key用defineReactive进行处理
defineReactive会生成一个dep实例,并设置key的getter和setter
在mouted阶段,vue会初始化一个render watcher实例,watcher在实例化的过程中会将Dep.target指向自身,然后运行回调函数,并且有一个入栈的操作(可能是递归处理的时候方便恢复,因为是子组件先mouted,这是我自己猜测的)
render watch对应的回调函数就是vm._update(vm._render(), hydrating),在构建虚拟dom的过程中,会触发视图依赖数据的getter函数(在构建虚拟dom的过程中,应该会深度遍历子组件,先完成子组件的依赖收集,这也是watch入栈出栈的原因吧)
getter函数 会将数据对应的dep和当前的render watch 互相链接(持有)
虚拟dom及挂载完成,render watch 会进行出栈
执行 cleanupDeps ,用新的订阅替换旧订阅(性能优化,详细参考黄轶blog)
其它需要掌握的点 keep-alive组件 https://ustbhuangyi.github.io/vue-analysis/v2/extend/keep-alive.html#%E5%86%85%E7%BD%AE%E7%BB%84%E4%BB%B6
需要注意的点
Keep-alive缓存的是vnode
keep-alive 只缓存第一个子组件
vnode.elm 缓存了 vnode 创建生成的 DOM 节点再次激活的时候跳过mount过程,直接把dom插入目标元素中
数组原型拦截 简单的描述一下过程:
在observe数组时,会将数组的__proto__指向由Array.prototype拓展而来的原型对象,该对象会原原本本的执行数组原生的方法,并针对七种方法做了重新定义,把新添加的值变成一个响应式对象,并且再调用 ob.dep.notify() 手动触发依赖通知
1 2 3 4 5 6 7 8 9 10 11 12 13 14 15 16 17 18 19 20 21 22 23 24 25 26 27 28 29 30 31 32 33 34 35 36 37 38 39 40 41 42 43 import { def } from '../util/index' const arrayProto = Array.prototype export const arrayMethods = Object.create(arrayProto) const methodsToPatch = [ 'push', 'pop', 'shift', 'unshift', 'splice', 'sort', 'reverse' ] /** * Intercept mutating methods and emit events */ methodsToPatch.forEach(function (method) { // cache original method const original = arrayProto[method] // 重新定义七种方法 def(arrayMethods, method, function mutator (...args) { // 调用原方法 const result = original.apply(this, args) // 数组对象的__ob__ const ob = this.__ob__ let inserted switch (method) { case 'push': case 'unshift': inserted = args break case 'splice': inserted = args.slice(2) break } if (inserted) ob.observeArray(inserted) // notify change ob.dep.notify() return result }) })
只是拓展了数组原型链还不够,还需要将数组的__proto__指向拓展后的类,这段代码在vue源码中Observe类中
1 2 3 4 5 6 7 8 9 10 if (Array.isArray(value)) { if (hasProto) { protoAugment(value, arrayMethods) } else { copyAugment(value, arrayMethods, arrayKeys) } this.observeArray(value) } else { this.walk(value) }
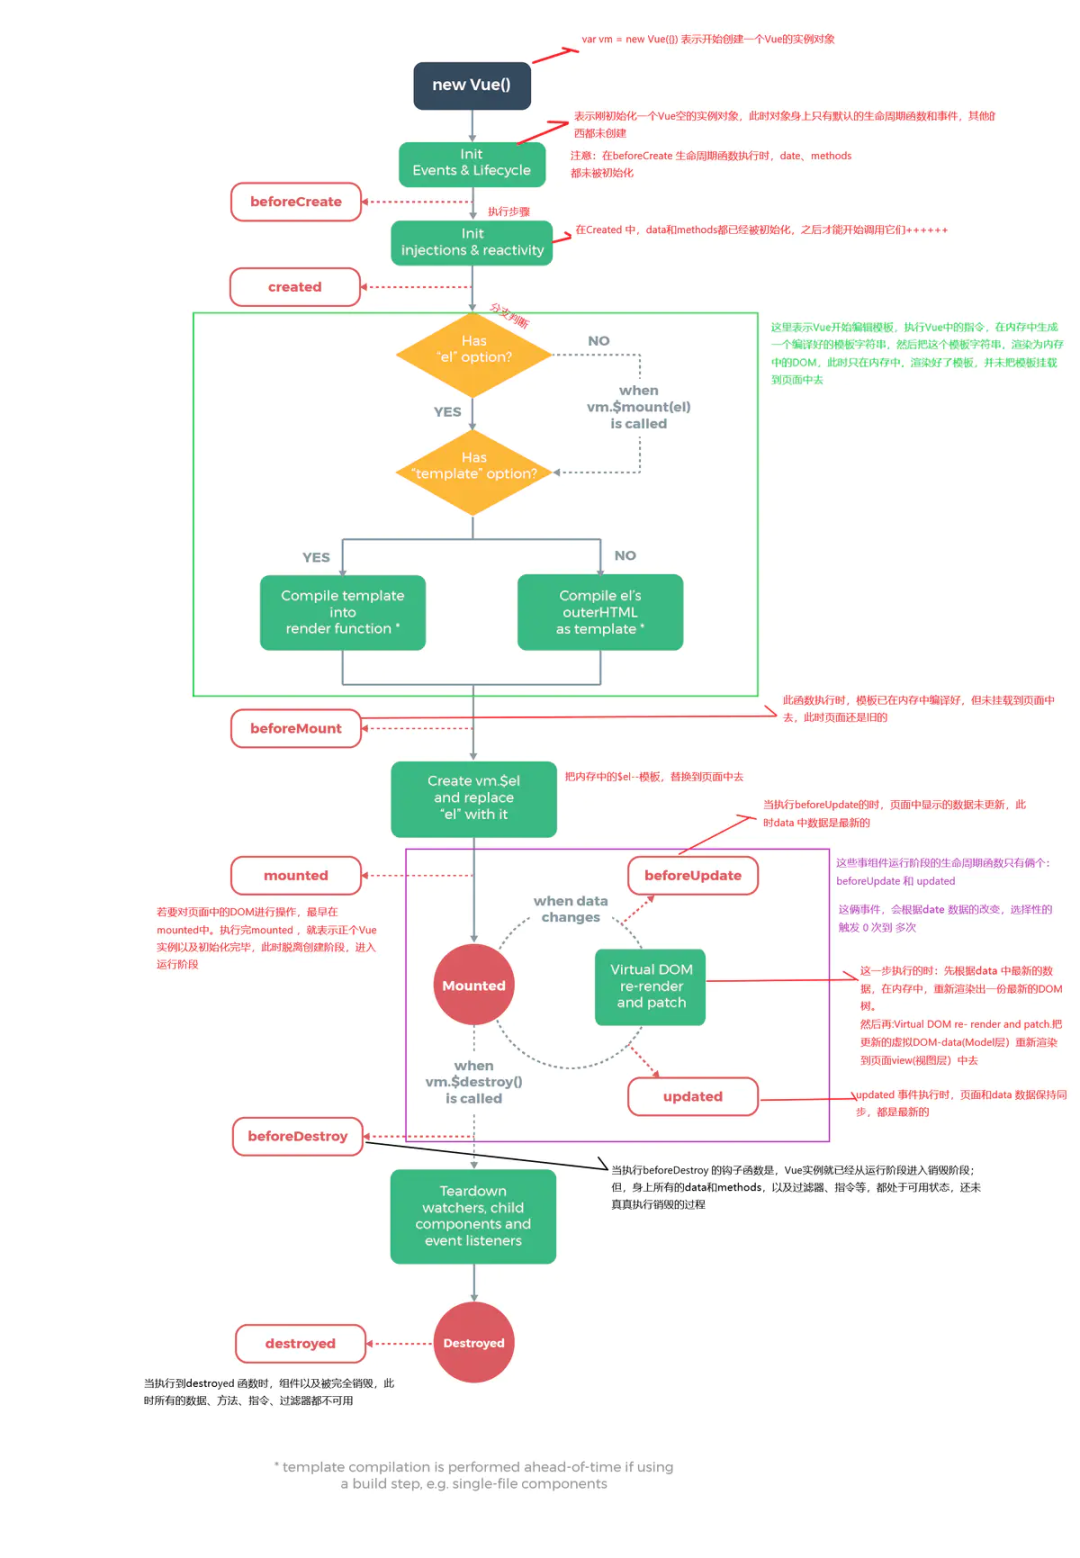
生命周期
要掌握每个生命周期什么时候被调用
beforeCreate 在实例初始化之后,数据观测(data observer) 之前被调用。
initLifecycle(vm): 主要作用是确认组件的父子关系和初始化某些实例属性。找到父组件实例赋值给vm.$parent,将自己push给父组件的$children;
initEvents(vm): 主要作用是将父组件使用v-on或@注册的自定义事件添加到子组件的私有属性vm._events中;
initRender(vm): 主要作用是初始化用来将render函数转为vnode的两个方法vm._c 和vm.$createElement。用户自定义的render函数的参数h就是vm.$createElement方法,它可以返回vnode。此阶段还会进行$attrs $listeners $slots $scopedSlots的处理, 此时用户可以在函数中通过this访问到vm.$parent和vm.$createElement $attrs $listeners $slots $scopedSlots等有限的属性和方法。等以上操作全部完成,就会执行beforeCreate钩子函数
created 实例已经创建完成之后被调用。在这一步,实例已完成以下的配置:数据观测(data observer),属性和方法的运算,inject,然后初始化props/data状态,最后初始化provide,这样做的目的是可以在props/data中使用inject内所注入的内容。created钩子函数,此时用户可以在函数中通过this访问到vm中的props,methods,data,computed,watch和inject等大部分属性和方法。
initInjections(vm): 初始化inject,使得vm可以访问到对应的依赖;
initState(vm): 初始化会被使用到的状态,状态包括props,methods,data,computed,watch五个选项。调用相应的init方法,使用vm.$options中提供的选项对这些状态进行初始化,其中initData方法会调用observe(data, true),实现对data中属性的监听,实际上是使用Object.defineProperty方法定义属性的getter和setter方法;
initProvide(vm):初始化provide,使得vm可以为子组件提供依赖(所以在initState后)。
beforeMount 在挂载开始之前被调用:相关的 render 函数首次被调用。
mounted el 被新创建的 vm.$el 替换,并挂载到实例上去之后调用该钩子。
beforeUpdate 数据更新时调用,发生在虚拟 DOM 重新渲染和打补丁之前。
updated 由于数据更改导致的虚拟 DOM 重新渲染和打补丁,在这之后会调用该钩子。
beforeDestroy 实例销毁之前调用。在这一步,实例仍然完全可用。
destroyed Vue 实例销毁后调用。调用后, Vue 实例指示的所有东西都会解绑定,所有的事件监听器会被移除,所有的子实例也会被销毁。 该钩子在服务器端渲染期间不被调用
要掌握每个生命周期内部可以做什么事
created 实例已经创建完成,因为它是最早触发的原因可以进行一些数据,资源的请求。
mounted 实例已经挂载完成,可以进行一些DOM操作
beforeUpdate 可以在这个钩子中进一步地更改状态,这不会触发附加的重渲染过程。
updated 可以执行依赖于 DOM 的操作。然而在大多数情况下,你应该避免在此期间更改状态,因为这可能会导致更新无限循环。该钩子在服务器端渲染期间不被调用。
destroyed 可以执行一些优化操作,清空定时器,解除绑定事件
Vue 的父组件和子组件生命周期钩子
父 beforeCreate -> 父 created -> 父 beforeMount -> 子 beforeCreate -> 子 created -> 子 beforeMount -> 子 mounted -> 父 mounted
父 beforeUpdate -> 子 beforeUpdate -> 子 updated -> 父 updated
父 beforeDestroy -> 子 beforeDestroy -> 子 destroyed -> 父 destroyed
diff算法 https://vue3js.cn/interview/vue/diff.html#%E4%BA%8C%E3%80%81%E6%AF%94%E8%BE%83%E6%96%B9%E5%BC%8F
https://juejin.cn/post/6994959998283907102#comment