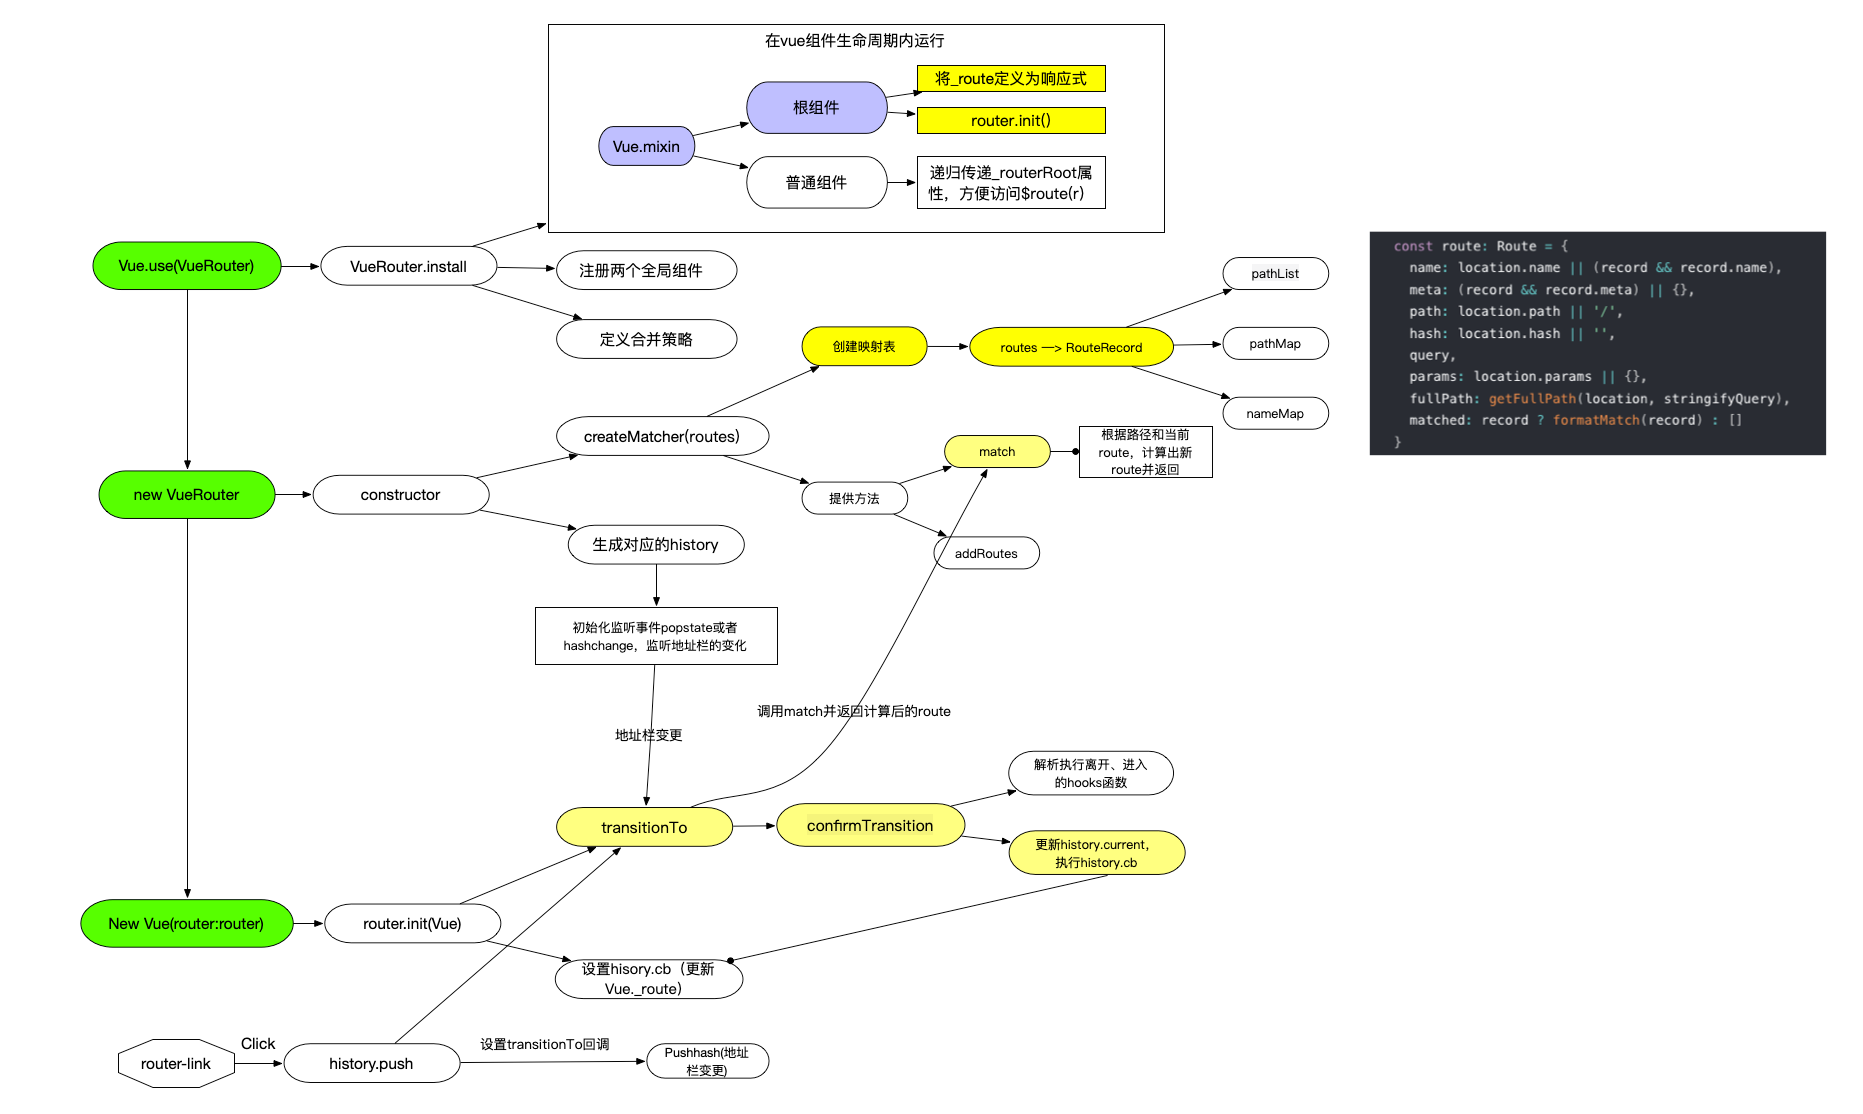
vue-router源码分析-简易流程
简易流程
vue-router的整体流程不难理解,难点在于一些功能的实现。

首先初始化vue-router实例,然后vue.use,再然后根vue初始化,作为配置传入
vue.use vue-router
Vue-router install
混入,根组件保存router和route属性,通过混入
beforeCreated子组件递归持有根组件(Vue)Object.defineProperty(Vue.prototype, '$route', { // 混入beforeCreated 保证所有组件都能访问到 _routerRoot vue根实例 get () { return this._routerRoot._route } })> 所有的组件都持有_RouterRoot属性(Vue),Vue根实例持有_route和router属性1
2
3
4
- ```
// 非根组件递归持有根组件Vue
this._routerRoot = (this.$parent && this.$parent._routerRoot) || this
vue-router 初始化
- 首先生成实例,执行constructor
- 生成matcher,createMatcher
- 根据routes创建一个路由映射表 {pathList, pathMap, nameMap}
- 提供match方法
- 根据mode,初始化相应history
- 生成matcher,createMatcher
- 执行init方法-vue根实例初始化的时候执行
- history.transitionTo 根据当前路径渲染组件
- const route = this.router.match(location, this.current) 匹配路由
- History.listen 定义 history.cb 在多种情况下更新 vue._route,保证其正确性,方便被watch
- history.transitionTo 根据当前路径渲染组件
- 首先生成实例,执行constructor
Vue.util.defineReactive(this,
_route, this._router.history.current) 定义响应式registerInstance router-view相关 主要是在route.instance保存当前rv实例
Object.defineProperty(Vue.prototype,
$router和$route)方便组件内使用Vue.component
RouterView,RouterLink定义合并策略
重要部分介绍
mather介绍
1 | function createMatcher ( |
createRouteMap 根据传入的routes配置,创建一个路由映射表 {pathList, pathMap, nameMap}
pathList存储所有的pathpathMap表示一个path到RouteRecord的映射关系nameMap表示name到RouteRecord的映射关系遍历routes数组,调用addRouteRecord
根据routes创建相关映射表,如果存在children,则递归处理,保证每一个路由地址都有一个与之对应的routeRecord,这条记录还会包含子路由所有层级的父record记录
RouteRecord const record: RouteRecord = { path: normalizedPath, // path 解析成一个正则表达式 regex: compileRouteRegex(normalizedPath, pathToRegexpOptions), components: route.components || { default: route.component }, alias: route.alias ? typeof route.alias === 'string' ? [route.alias] : route.alias : [], instances: {}, // 表示rv组件的实例 enteredCbs: {}, name, parent, // 表示父的 RouteRecord 只能向上寻找 matchAs, redirect: route.redirect, beforeEnter: route.beforeEnter, meta: route.meta || {}, props: route.props == null ? {} : route.components ? route.props : { default: route.props } }1
2
3
4
5
- 保证*匹配符保持在最后
- match方法解析 匹配出对应的record,然后通过`createRoute`创建`Route`
function match (
raw: RawLocation(string | location),
currentRoute?: Route,
redirectedFrom?: Location
): Route1
2
3
- createRoute函数, `createRoute` 可以根据 `record` 和 `location` 创建出来,最终返回的是一条 `Route` 路径export function createRoute (
record: ?RouteRecord,
location: Location,
redirectedFrom?: ?Location,
router?: VueRouter
): Route {
const stringifyQuery = router && router.options.stringifyQuerylet query: any = location.query || {}
try {
query = clone(query)
} catch (e) {}const route: Route = {
name: location.name || (record && record.name),
meta: (record && record.meta) || {},
path: location.path || ‘/‘,
hash: location.hash || ‘’,
query,
params: location.params || {},
fullPath: getFullPath(location, stringifyQuery),
matched: record ? formatMatch(record) : []
}
if (redirectedFrom) {
route.redirectedFrom = getFullPath(redirectedFrom, stringifyQuery)
}
return Object.freeze(route)
}1
2
3
4
5
6
7
8
9
10
11
12
13
14
15
16
17
18
19
20
21
- `Route` 对象中有一个非常重要属性是 `matched`,它通过 `formatMatch(record)` 计算而来:
````
function formatMatch (record: ?RouteRecord): Array<RouteRecord> {
const res = []
while (record) {
res.unshift(record)
record = record.parent
}
return res
}
````
可以看它是通过 `record` 循环向上找 `parent`,直到找到最外层,并把所有的 `record` 都 push 到一个数组中,最终返回的就是 `record` 的数组,它记录了一条线路上的所有 `record`。==`matched` 属性非常有用,它为之后渲染组件提供了依据==。
#### 路径切换 history.transitonTo
- 点击 `router-link` 的时候,实际上最终会执行 `router.push`push (location: RawLocation, onComplete?: Function, onAbort?: Function) {
this.history.push(location, onComplete, onAbort)
}
push (location: RawLocation, onComplete?: Function, onAbort?: Function) {
const { current: fromRoute } = this
this.transitionTo(location, route => {
//
// https://zhuanlan.zhihu.com/p/35036172
pushHash(route.fullPath)
handleScroll(this.router, route, fromRoute, false)
onComplete && onComplete(route)
}, onAbort)
}1
2
3
- 在history的初始化中,针对历史栈做了一个监听window.addEventListener(supportsPushState ? ‘popstate’ : ‘hashchange’….
1
2
3
4
5
6
7
8
9
10
11
12
13
14
15
16
17
18
19
20
21
22
23
24
25
26
27
28
29
30
31
32
33
34
35
36
37
38
39
40
41
42
43
44
45
46
47
48
之所以做监听,是为了用户在使用前进后退时,渲染正确的组件
- Router-view
当我们执行 `transitionTo` 来更改路由线路后,组件是如何重新渲染的呢
- Router-Link
### 附录:源码重要类-类型注解
- history类 src/history/*.js
````javascript
router: Router
base: string
current: Route
pending: ?Route
cb: (r: Route) => void
ready: boolean
readyCbs: Array<Function>
readyErrorCbs: Array<Function>
errorCbs: Array<Function>
listeners: Array<Function>
cleanupListeners: Function
// implemented by sub-classes
+go: (n: number) => void
+push: (loc: RawLocation, onComplete?: Function, onAbort?: Function) => void
+replace: (
loc: RawLocation,
onComplete?: Function,
onAbort?: Function
) => void
+ensureURL: (push?: boolean) => void
+getCurrentLocation: () => string
+setupListeners: Function
````
- matcher类 src/create-matcher.js
```javascript
export type Matcher = {
match: (raw: RawLocation, current?: Route, redirectedFrom?: Location) => Route;
addRoutes: (routes: Array<RouteConfig>) => void;
addRoute: (parentNameOrRoute: string | RouteConfig, route?: RouteConfig) => void;
getRoutes: () => Array<RouteRecord>;
};createRouteMap src/creat-route-map
createRouteMap函数的目标是把用户的路由配置转换成一张路由映射表,它包含 3 个部分,pathList存储所有的path,pathMap表示一个path到RouteRecord的映射关系,nameMap表示name到RouteRecord的映射关系。
1
2
3
4
5
6
7
8
9
10
11export function createRouteMap (
routes: Array<RouteConfig>,
oldPathList?: Array<string>,
oldPathMap?: Dictionary<RouteRecord>,
oldNameMap?: Dictionary<RouteRecord>,
parentRoute?: RouteRecord
): {
pathList: Array<string>,
pathMap: Dictionary<RouteRecord>,
nameMap: Dictionary<RouteRecord>
} {...}addRouterRecord 生成并添加一条routerRecord
1
2
3
4
5
6
7
8function addRouteRecord (
pathList: Array<string>,
pathMap: Dictionary<RouteRecord>,
nameMap: Dictionary<RouteRecord>,
route: RouteConfig,
parent?: RouteRecord,
matchAs?: string
)
Location RawLocation
- Vue-Router 中定义的
Location数据结构和浏览器提供的window.location部分结构有点类似,它们都是对url的结构化描述。举个例子:/abc?foo=bar&baz=qux#hello,它的path是/abc,query是{foo:'bar',baz:'qux'}。
1
2
3
4
5
6
7
8
9
10
11declare type Location = {
_normalized?: boolean;
name?: string;
path?: string;
hash?: string;
query?: Dictionary<string>;
params?: Dictionary<string>;
append?: boolean;
replace?: boolean;
}
declare type RawLocation = string | Location- Vue-Router 中定义的
Route
Route表示的是路由中的一条线路,它除了描述了类似Loctaion的path、query、hash这些概念,还有matched表示匹配到的所有的RouteRecord。Route的其他属性我们之后会介绍。
1
2
3
4
5
6
7
8
9
10
11declare type Route = {
path: string;
name: ?string;
hash: string;
query: Dictionary<string>;
params: Dictionary<string>;
fullPath: string;
matched: Array<RouteRecord>;
redirectedFrom?: string;
meta?: any;
}可以说location 经过了match之后变成了routerRecord,routerRecord经过
_createRoute变成了route这样比较好理解
RouterRecord
1
2
3
4
5
6
7
8
9
10
11
12
13
14
15declare type RouteRecord = {
path: string;
alias: Array<string>;
regex: RouteRegExp;
components: Dictionary<any>;
instances: Dictionary<any>;
enteredCbs: Dictionary<Array<Function>>;
name: ?string;
parent: ?RouteRecord;
redirect: ?RedirectOption;
matchAs: ?string;
beforeEnter: ?NavigationGuard;
meta: any;
props: boolean | Object | Function | Dictionary<boolean | Object | Function>;
}
其他重要内容
当我们执行
transitionTo来更改路由线路后,组件是如何重新渲染的呢由于我们把根 Vue 实例的
_route属性定义成响应式的,我们在每个<router-view>执行render函数的时候,都会访问parent.$route,如我们之前分析会访问this._routerRoot._route,触发了它的getter,相当于<router-view>对它有依赖,然后再执行完transitionTo后,修改app._route的时候,又触发了setter,因此会通知<router-view>的渲染watcher更新,重新渲染组件。所有组件都是访问到的
$router和$router是怎么来的1.设置Vue根实例的_routerRoot属性为Vue根实例
2.混入Vue生命周期,beforeCreate函数层层传递_routerRoot属性,是所有组件都可以通过
_routerRoot访问到Vue根实例3.定义Vue的原型属性
$route$router的getter方法1
2
3Object.defineProperty(Vue.prototype, '$router', {
get () { return this._routerRoot._router }
})非常经典的异步函数队列化执行的模式,这也就是为什么官方文档会说只有执行
next方法来resolve这个钩子函数1
2
3
4
5
6
7
8
9
10
11
12
13
14
15
16
17
18
19
20
21
22
23
24
25
26
27function runQueue (queue, fn, cb) {
const step = index => {
if (index >= queue.length) {
cb()
} else {
if (queue[index]) {
fn(queue[index], () => {
step(index + 1)
})
} else {
step(index + 1)
}
}
}
step(0)
}
// 代表一个个hooks函数
const arr = [1, 2, 3, 4, 5, 6, 7, 8, 9]
const iterator = (hook, next) => {
console.log(hook);
next()
}
runQueue(arr, iterator, () => {
console.log("遍历完了");
})
// 1 2 3 4 5 6 7 8 9 遍历完了
