Iterator 和 for…of 循环

Iterator(遍历器)的概念

JavaScript 原有的表示“集合”的数据结构,主要是数组(Array)和对象(Object),ES6 又添加了MapSet。这样就有了四种数据集合,用户还可以组合使用它们,定义自己的数据结构,比如数组的成员是MapMap的成员是对象。这样就需要一种统一的接口机制,来处理所有不同的数据结构。

遍历器(Iterator)就是这样一种机制。它是一种接口,为各种不同的数据结构提供统一的访问机制。任何数据结构只要部署 Iterator 接口,就可以完成遍历操作(即依次处理该数据结构的所有成员)。

Iterator 的作用有三个:一是为各种数据结构,提供一个统一的、简便的访问接口;二是使得数据结构的成员能够按某种次序排列;三是 ES6 创造了一种新的遍历命令for...of循环,Iterator 接口主要供for...of消费。

Iterator 的遍历过程是这样的。

(1)创建一个指针对象,指向当前数据结构的起始位置。也就是说,遍历器对象本质上,就是一个指针对象。

(2)第一次调用指针对象的next方法,可以将指针指向数据结构的第一个成员。

(3)第二次调用指针对象的next方法,指针就指向数据结构的第二个成员。

(4)不断调用指针对象的next方法,直到它指向数据结构的结束位置。

每一次调用next方法,都会返回数据结构的当前成员的信息。具体来说,就是返回一个包含valuedone两个属性的对象。其中,value属性是当前成员的值,done属性是一个布尔值,表示遍历是否结束。

默认 Iterator 接口

Iterator 接口的目的,就是为所有数据结构,提供了一种统一的访问机制,即for...of循环(详见下文)。当使用for...of循环遍历某种数据结构时,该循环会自动去寻找 Iterator 接口。

一种数据结构只要部署了 Iterator 接口,我们就称这种数据结构是“可遍历的”(iterable)。

ES6 规定,默认的 Iterator 接口部署在数据结构的Symbol.iterator属性,或者说,一个数据结构只要具有Symbol.iterator属性,就可以认为是“可遍历的”(iterable)。Symbol.iterator属性本身是一个函数,就是当前数据结构默认的遍历器生成函数。执行这个函数,就会返回一个遍历器。至于属性名Symbol.iterator,它是一个表达式,返回Symbol对象的iterator属性,这是一个预定义好的、类型为 Symbol 的特殊值,所以要放在方括号内(参见《Symbol》一章)。

原生具备 Iterator 接口的数据结构如下。

  • Array
  • Map
  • Set
  • String
  • TypedArray
  • 函数的 arguments 对象
  • NodeList 对象

对于原生部署 Iterator 接口的数据结构,不用自己写遍历器生成函数,for...of循环会自动遍历它们。除此之外,其他数据结构(主要是对象)的 Iterator 接口,都需要自己在Symbol.iterator属性上面部署,这样才会被for...of循环遍历。

对象(Object)之所以没有默认部署 Iterator 接口,是因为对象的哪个属性先遍历,哪个属性后遍历是不确定的,需要开发者手动指定。本质上,遍历器是一种线性处理,对于任何非线性的数据结构,部署遍历器接口,就等于部署一种线性转换。不过,严格地说,对象部署遍历器接口并不是很必要,因为这时对象实际上被当作 Map 结构使用,ES5 没有 Map 结构,而 ES6 原生提供了。

调用 Iterator 接口的场合

有一些场合会默认调用 Iterator 接口(即Symbol.iterator方法),除了下文会介绍的for...of循环,还有几个别的场合。

(1)解构赋值

对数组和 Set 结构进行解构赋值时,会默认调用Symbol.iterator方法。

1
2
3
4
5
6
7
let set = new Set().add('a').add('b').add('c');

let [x,y] = set;
// x='a'; y='b'

let [first, ...rest] = set;
// first='a'; rest=['b','c'];

(2)扩展运算符

扩展运算符(…)也会调用默认的 Iterator 接口。

1
2
3
4
5
6
7
8
// 例一
var str = 'hello';
[...str] // ['h','e','l','l','o']

// 例二
let arr = ['b', 'c'];
['a', ...arr, 'd']
// ['a', 'b', 'c', 'd']

上面代码的扩展运算符内部就调用 Iterator 接口。

实际上,这提供了一种简便机制,可以将任何部署了 Iterator 接口的数据结构,转为数组。也就是说,只要某个数据结构部署了 Iterator 接口,就可以对它使用扩展运算符,将其转为数组。

1
let arr = [...iterable];

(3)yield*

yield*后面跟的是一个可遍历的结构,它会调用该结构的遍历器接口。

1
2
3
4
5
6
7
8
9
10
11
12
13
14
let generator = function* () {
yield 1;
yield* [2,3,4];
yield 5;
};

var iterator = generator();

iterator.next() // { value: 1, done: false }
iterator.next() // { value: 2, done: false }
iterator.next() // { value: 3, done: false }
iterator.next() // { value: 4, done: false }
iterator.next() // { value: 5, done: false }
iterator.next() // { value: undefined, done: true }

(4)其他场合

由于数组的遍历会调用遍历器接口,所以任何接受数组作为参数的场合,其实都调用了遍历器接口。下面是一些例子。

  • for…of
  • Array.from()
  • Map(), Set(), WeakMap(), WeakSet()(比如new Map([['a',1],['b',2]])
  • Promise.all()
  • Promise.race()

字符串的 Iterator 接口

字符串是一个类似数组的对象,也原生具有 Iterator 接口。

1
2
3
4
5
6
7
8
9
var someString = "hi";
typeof someString[Symbol.iterator]
// "function"

var iterator = someString[Symbol.iterator]();

iterator.next() // { value: "h", done: false }
iterator.next() // { value: "i", done: false }
iterator.next() // { value: undefined, done: true }

上面代码中,调用Symbol.iterator方法返回一个遍历器对象,在这个遍历器上可以调用 next 方法,实现对于字符串的遍历。

for…of 循环

ES6 借鉴 C++、Java、C# 和 Python 语言,引入了for...of循环,作为遍历所有数据结构的统一的方法。

一个数据结构只要部署了Symbol.iterator属性,就被视为具有 iterator 接口,就可以用for...of循环遍历它的成员。也就是说,for...of循环内部调用的是数据结构的Symbol.iterator方法。

for...of循环可以使用的范围包括数组、Set 和 Map 结构、某些类似数组的对象(比如arguments对象、DOM NodeList 对象)、后文的 Generator 对象,以及字符串。

数组

数组原生具备iterator接口(即默认部署了Symbol.iterator属性),for...of循环本质上就是调用这个接口产生的遍历器,可以用下面的代码证明。

1
2
3
4
5
6
7
8
9
10
11
12
const arr = ['red', 'green', 'blue'];

for(let v of arr) {
console.log(v); // red green blue
}

const obj = {};
obj[Symbol.iterator] = arr[Symbol.iterator].bind(arr);

for(let v of obj) {
console.log(v); // red green blue
}

上面代码中,空对象obj部署了数组arrSymbol.iterator属性,结果objfor...of循环,产生了与arr完全一样的结果。

for...of循环可以代替数组实例的forEach方法。

1
2
3
4
5
6
const arr = ['red', 'green', 'blue'];

arr.forEach(function (element, index) {
console.log(element); // red green blue
console.log(index); // 0 1 2
});

JavaScript 原有的for...in循环,只能获得对象的键名,不能直接获取键值。ES6 提供for...of循环,允许遍历获得键值。

1
2
3
4
5
6
7
8
9
var arr = ['a', 'b', 'c', 'd'];

for (let a in arr) {
console.log(a); // 0 1 2 3
}

for (let a of arr) {
console.log(a); // a b c d
}

上面代码表明,for...in循环读取键名,for...of循环读取键值。如果要通过for...of循环,获取数组的索引,可以借助数组实例的entries方法和keys方法(参见《数组的扩展》一章)。

for...of循环调用遍历器接口,数组的遍历器接口只返回具有数字索引的属性。这一点跟for...in循环也不一样。

1
2
3
4
5
6
7
8
9
10
let arr = [3, 5, 7];
arr.foo = 'hello';

for (let i in arr) {
console.log(i); // "0", "1", "2", "foo"
}

for (let i of arr) {
console.log(i); // "3", "5", "7"
}

上面代码中,for...of循环不会返回数组arrfoo属性。

Set 和 Map 结构

Set 和 Map 结构也原生具有 Iterator 接口,可以直接使用for...of循环。

1
2
3
4
5
6
7
8
9
10
11
12
13
14
15
16
17
18
var engines = new Set(["Gecko", "Trident", "Webkit", "Webkit"]);
for (var e of engines) {
console.log(e);
}
// Gecko
// Trident
// Webkit

var es6 = new Map();
es6.set("edition", 6);
es6.set("committee", "TC39");
es6.set("standard", "ECMA-262");
for (var [name, value] of es6) {
console.log(name + ": " + value);
}
// edition: 6
// committee: TC39
// standard: ECMA-262

上面代码演示了如何遍历 Set 结构和 Map 结构。值得注意的地方有两个,首先,遍历的顺序是按照各个成员被添加进数据结构的顺序。其次,Set 结构遍历时,返回的是一个值,而 Map 结构遍历时,返回的是一个数组,该数组的两个成员分别为当前 Map 成员的键名和键值。

1
2
3
4
5
6
7
8
9
10
11
12
let map = new Map().set('a', 1).set('b', 2);
for (let pair of map) {
console.log(pair);
}
// ['a', 1]
// ['b', 2]

for (let [key, value] of map) {
console.log(key + ' : ' + value);
}
// a : 1
// b : 2

计算生成的数据结构

有些数据结构是在现有数据结构的基础上,计算生成的。比如,ES6 的数组、Set、Map 都部署了以下三个方法,调用后都返回遍历器对象。

  • entries() 返回一个遍历器对象,用来遍历[键名, 键值]组成的数组。对于数组,键名就是索引值;对于 Set,键名与键值相同。Map 结构的 Iterator 接口,默认就是调用entries方法。
  • keys() 返回一个遍历器对象,用来遍历所有的键名。
  • values() 返回一个遍历器对象,用来遍历所有的键值。

这三个方法调用后生成的遍历器对象,所遍历的都是计算生成的数据结构。

1
2
3
4
5
6
7
let arr = ['a', 'b', 'c'];
for (let pair of arr.entries()) {
console.log(pair);
}
// [0, 'a']
// [1, 'b']
// [2, 'c']

类似数组的对象

类似数组的对象包括好几类。下面是for...of循环用于字符串、DOM NodeList 对象、arguments对象的例子。

1
2
3
4
5
6
7
8
9
10
11
12
13
14
15
16
17
18
19
20
21
22
23
// 字符串
let str = "hello";

for (let s of str) {
console.log(s); // h e l l o
}

// DOM NodeList对象
let paras = document.querySelectorAll("p");

for (let p of paras) {
p.classList.add("test");
}

// arguments对象
function printArgs() {
for (let x of arguments) {
console.log(x);
}
}
printArgs('a', 'b');
// 'a'
// 'b'

对于字符串来说,for...of循环还有一个特点,就是会正确识别 32 位 UTF-16 字符。

1
2
3
4
5
for (let x of 'a\uD83D\uDC0A') {
console.log(x);
}
// 'a'
// '\uD83D\uDC0A'

并不是所有类似数组的对象都具有 Iterator 接口,一个简便的解决方法,就是使用Array.from方法将其转为数组。

1
2
3
4
5
6
7
8
9
10
11
let arrayLike = { length: 2, 0: 'a', 1: 'b' };

// 报错
for (let x of arrayLike) {
console.log(x);
}

// 正确
for (let x of Array.from(arrayLike)) {
console.log(x);
}

对象

对于普通的对象,for...of结构不能直接使用,会报错,必须部署了 Iterator 接口后才能使用。但是,这样情况下,for...in循环依然可以用来遍历键名。

1
2
3
4
5
6
7
8
9
10
11
12
13
14
15
16
17
let es6 = {
edition: 6,
committee: "TC39",
standard: "ECMA-262"
};

for (let e in es6) {
console.log(e);
}
// edition
// committee
// standard

for (let e of es6) {
console.log(e);
}
// TypeError: es6[Symbol.iterator] is not a function

上面代码表示,对于普通的对象,for...in循环可以遍历键名,for...of循环会报错。

一种解决方法是,使用Object.keys方法将对象的键名生成一个数组,然后遍历这个数组。

1
2
3
for (var key of Object.keys(someObject)) {
console.log(key + ': ' + someObject[key]);
}

另一个方法是使用 Generator 函数将对象重新包装一下。

1
2
3
4
5
6
7
8
9
10
11
12
function* entries(obj) {
for (let key of Object.keys(obj)) {
yield [key, obj[key]];
}
}

for (let [key, value] of entries(obj)) {
console.log(key, '->', value);
}
// a -> 1
// b -> 2
// c -> 3

与其他遍历语法的比较

以数组为例,JavaScript 提供多种遍历语法。最原始的写法就是for循环。

1
2
3
for (var index = 0; index < myArray.length; index++) {
console.log(myArray[index]);
}

这种写法比较麻烦,因此数组提供内置的forEach方法。

1
2
3
myArray.forEach(function (value) {
console.log(value);
});

这种写法的问题在于,无法中途跳出forEach循环,break命令或return命令都不能奏效。

for...in循环可以遍历数组的键名。

1
2
3
for (var index in myArray) {
console.log(myArray[index]);
}

for...in循环有几个缺点。

  • 数组的键名是数字,但是for...in循环是以字符串作为键名“0”、“1”、“2”等等。
  • for...in循环不仅遍历数字键名,还会遍历手动添加的其他键,甚至包括原型链上的键。
  • 某些情况下,for...in循环会以任意顺序遍历键名。

总之,for...in循环主要是为遍历对象而设计的,不适用于遍历数组。

for...of循环相比上面几种做法,有一些显著的优点

1
2
3
for (let value of myArray) {
console.log(value);
}
  • 有着同for...in一样的简洁语法,但是没有for...in那些缺点。
  • 不同于forEach方法,它可以与breakcontinuereturn配合使用。
  • 提供了遍历所有数据结构的统一操作接口。

下面是一个使用 break 语句,跳出for...of循环的例子。

1
2
3
4
5
for (var n of fibonacci) {
if (n > 1000)
break;
console.log(n);
}

上面的例子,会输出斐波纳契数列小于等于 1000 的项。如果当前项大于 1000,就会使用break语句跳出for...of循环。

记录一下需要记忆的点

finally的实现方式

虽然看起来很简单,但是也值得思索

1
2
3
4
5
6
7
8
9
10
Promise.prototype.myFinally = function (callback) {
其实这个P === Promise // true
let P = this.constructor;
// finally其实返回了一个then 在resolve和reject的情况下 都会触发
return this.then(
value => P.resolve(callback()).then(() => value),
// 这里继续扔出了一个错误,避免下一个catch无法捕获到错误
reason => P.resolve(callback()).then(() => { throw reason })
);
};

从上边的代码,我们可以得知

  • 错误捕获到后,就不会继续冒泡了,也就是不会被后面的catch捕获,所以上边代码加了一个throw reson

  • 从上面的实现还可以看到,finally方法总是会返回原来的值,注意下述代码

    1
    2
    3
    4
    5
    6
    7
    8
    9
    10
    11
    12
    13
    14
    15
    const p2 = new Promise(function (resolve, reject) {
    setTimeout(() => resolve("11111"), 1000)
    })
    Promise.prototype.myFinally = function (callback) {
    let P = this.constructor;
    return this.then(
    value => P.resolve(callback()).then(() => value),
    reason => P.resolve(callback()).then(() => { throw reason })
    );
    };
    p2.myFinally(() => {

    }).then(res => {
    console.log(res); // 1111
    })

    也就意味着在promise中穿插finally 并不会有副作用

  • // TODO P.resolve(callback()).then(() => value) 为什么需要这么长呢

面试手写promise

面试够用版

没实现异步吧 我觉得

来源:实现一个完美符合Promise/A+规范的Promise

1
2
3
4
5
6
7
8
9
10
11
12
13
14
15
16
17
18
19
20
21
22
23
24
25
26
27
28
29
30
31
32
33
34
35
36
37
38
39
function myPromise(constructor){
let self=this;
self.status="pending" //定义状态改变前的初始状态
self.value=undefined;//定义状态为resolved的时候的状态
self.reason=undefined;//定义状态为rejected的时候的状态
function resolve(value){
//两个==="pending",保证了状态的改变是不可逆的
if(self.status==="pending"){
self.value=value;
self.status="resolved";
}
}
function reject(reason){
//两个==="pending",保证了状态的改变是不可逆的
if(self.status==="pending"){
self.reason=reason;
self.status="rejected";
}
}
//捕获构造异常
try{
constructor(resolve,reject);
}catch(e){
reject(e);
}
}
myPromise.prototype.then=function(onFullfilled,onRejected){
let self=this;
switch(self.status){
case "resolved":
onFullfilled(self.value);
break;
case "rejected":
onRejected(self.reason);
break;
default:
}
}

大厂专供版

直接贴出来吧,这个版本还算好理解

1
2
3
4
5
6
7
8
9
10
11
12
13
14
15
16
17
18
19
20
21
22
23
24
25
26
27
28
29
30
31
32
33
34
35
36
37
38
39
40
41
42
43
44
45
46
47
48
49
50
51
52
53
54
55
56
57
58
59
60
61
62
63
64
65
66
67
68
69
70
71
72
73
74
75
76
77
78
79
80
81
82
83
84
85
86
87
88
89
90
91
92
93
94
95
96
97
98
99
100
101
102
103
104
105
106
107
108
const PENDING = "pending";
const FULFILLED = "fulfilled";
const REJECTED = "rejected";

function Promise(excutor) {
let that = this; // 缓存当前promise实例对象
that.status = PENDING; // 初始状态
that.value = undefined; // fulfilled状态时 返回的信息
that.reason = undefined; // rejected状态时 拒绝的原因
that.onFulfilledCallbacks = []; // 存储fulfilled状态对应的onFulfilled函数
that.onRejectedCallbacks = []; // 存储rejected状态对应的onRejected函数

function resolve(value) { // value成功态时接收的终值
if(value instanceof Promise) {
return value.then(resolve, reject);
}
// 实践中要确保 onFulfilled 和 onRejected 方法异步执行,且应该在 then 方法被调用的那一轮事件循环之后的新执行栈中执行。
setTimeout(() => {
// 调用resolve 回调对应onFulfilled函数
if (that.status === PENDING) {
// 只能由pending状态 => fulfilled状态 (避免调用多次resolve reject)
that.status = FULFILLED;
that.value = value;
that.onFulfilledCallbacks.forEach(cb => cb(that.value));
}
});
}
function reject(reason) { // reason失败态时接收的拒因
setTimeout(() => {
// 调用reject 回调对应onRejected函数
if (that.status === PENDING) {
// 只能由pending状态 => rejected状态 (避免调用多次resolve reject)
that.status = REJECTED;
that.reason = reason;
that.onRejectedCallbacks.forEach(cb => cb(that.reason));
}
});
}

// 捕获在excutor执行器中抛出的异常
// new Promise((resolve, reject) => {
// throw new Error('error in excutor')
// })
try {
excutor(resolve, reject);
} catch (e) {
reject(e);
}
}

Promise.prototype.then = function(onFulfilled, onRejected) {
const that = this;
let newPromise;
// 处理参数默认值 保证参数后续能够继续执行
onFulfilled =
typeof onFulfilled === "function" ? onFulfilled : value => value;
onRejected =
typeof onRejected === "function" ? onRejected : reason => {
throw reason;
};
if (that.status === FULFILLED) { // 成功态
return newPromise = new Promise((resolve, reject) => {
setTimeout(() => {
try{
let x = onFulfilled(that.value);
resolvePromise(newPromise, x, resolve, reject); // 新的promise resolve 上一个onFulfilled的返回值
} catch(e) {
reject(e); // 捕获前面onFulfilled中抛出的异常 then(onFulfilled, onRejected);
}
});
})
}

if (that.status === REJECTED) { // 失败态
return newPromise = new Promise((resolve, reject) => {
setTimeout(() => {
try {
let x = onRejected(that.reason);
resolvePromise(newPromise, x, resolve, reject);
} catch(e) {
reject(e);
}
});
});
}

if (that.status === PENDING) { // 等待态
// 当异步调用resolve/rejected时 将onFulfilled/onRejected收集暂存到集合中
return newPromise = new Promise((resolve, reject) => {
that.onFulfilledCallbacks.push((value) => {
try {
let x = onFulfilled(value);
resolvePromise(newPromise, x, resolve, reject);
} catch(e) {
reject(e);
}
});
that.onRejectedCallbacks.push((reason) => {
try {
let x = onRejected(reason);
resolvePromise(newPromise, x, resolve, reject);
} catch(e) {
reject(e);
}
});
});
}
};

对象的详细方法见js高程第四版第八章

对象ES6之后方法的简单总结

本章介绍 Object 对象的新增方法。

Object.is()

用来比较两个值是否严格相等,与严格比较运算符(===)的行为基本一致

不同之处只有两个:一是+0不等于-0,二是NaN等于自身

1
2
3
4
5
+0 === -0 //true
NaN === NaN // false

Object.is(+0, -0) // false
Object.is(NaN, NaN) // true

Object.assign()

Object.assign方法用于对象的合并,将源对象(source)的所有可枚举属性,复制到目标对象(target)。

1
2
3
4
5
6
7
const target = { a: 1 };

const source1 = { b: 2 };
const source2 = { c: 3 };

Object.assign(target, source1, source2);
target // {a:1, b:, c:3}

注意点

Object.assign拷贝的属性是有限制的,

  • 浅拷贝

  • 只拷贝源对象的自身属性(不拷贝继承属性)

  • 不拷贝不可枚举的属性enumerable: false

  • Object.assign只能进行值的复制,无法复制取值函数,将求值后再复制

  • 数组的处理

    Object.assign([1, 2, 3], [4, 5])
    // [4, 5, 3]

属性名为 Symbol 值的属性,也会被Object.assign拷贝。

完整的复制对象

1
2
3
4
5
6
7
8
9
10
11
12
// 写法一 不能复制不可枚举 不能复制取值函数 
const clone2 = Object.assign(
Object.create(Object.getPrototypeOf(obj)),
obj
);

// 写法二 完美复制
const clone3 = Object.create(
Object.getPrototypeOf(obj),
Object.getOwnPropertyDescriptors(obj)
)

Object.getOwnPropertyDescriptors()

ES5 的Object.getOwnPropertyDescriptor(obj, prop)方法会返回某个对象属性的描述对象(descriptor)。ES2017 引入了Object.getOwnPropertyDescriptors()方法,返回指定对象所有自身属性(非继承属性)的描述对象。

描述对象MDN

1
2
3
4
5
6
7
8
9
10
11
12
13
14
15
16
const obj = {
foo: 123,
get bar() { return 'abc' }
};

Object.getOwnPropertyDescriptors(obj)
// { foo:
// { value: 123,
// writable: true,
// enumerable: true,
// configurable: true },
// bar:
// { get: [Function: get bar],
// set: undefined,
// enumerable: true,
// configurable: true } }

原型链方法

JavaScript 语言的对象继承是通过原型链实现的。ES6 提供了更多原型对象的操作方法。

Object.setPrototypeOf()

Object.setPrototypeOf方法的作用与__proto__相同,用来设置一个对象的原型对象(prototype),返回参数对象本身。它是 ES6 正式推荐的设置原型对象的方法

1
2
3
4
5
// ==格式==
Object.setPrototypeOf(object, prototype)

// 用法
const o = Object.setPrototypeOf({}, null);

该方法等同于下面的函数。

1
2
3
4
function setPrototypeOf(obj, proto) {
obj.__proto__ = proto;
return obj;
}

Object.getPrototypeOf()

该方法与Object.setPrototypeOf方法配套,用于读取一个对象的原型对象。

1
Object.getPrototypeOf(obj);

遍历方法

Object.keys() Object.values Object.entries

都是不可遍历 对象自身的(不含继承的)所有可遍历(enumerable)属性的键名

ES5 引入了Object.keys方法,返回一个数组,成员是参数对象自身的(不含继承的)所有可遍历(enumerable)属性的键名

1
2
3
var obj = { foo: 'bar', baz: 42 };
Object.keys(obj)
// ["foo", "baz"]

ES2017 引入了跟Object.keys配套的Object.valuesObject.entries,作为遍历一个对象的补充手段,供for...of循环使用。

1
2
3
4
5
6
7
8
9
10
11
12
13
14
let {keys, values, entries} = Object;
let obj = { a: 1, b: 2, c: 3 };

for (let key of keys(obj)) {
console.log(key); // 'a', 'b', 'c'
}

for (let value of values(obj)) {
console.log(value); // 1, 2, 3
}

for (let [key, value] of entries(obj)) {
console.log([key, value]); // ['a', 1], ['b', 2], ['c', 3]
}

Object.fromEntries()

Object.fromEntries()方法是Object.entries()的逆操作,用于将一个键值对数组转为对象

1
2
3
4
5
Object.fromEntries([
['foo', 'bar'],
['baz', 42]
])
// { foo: "bar", baz: 42 }

该方法的主要目的,是将键值对的数据结构还原为对象,因此特别适合将 Map 结构转为对象。

1
2
3
4
5
6
7
8
9
// 例一
const entries = new Map([
['foo', 'bar'],
['baz', 42]
]);

Object.fromEntries(entries)
// { foo: "bar", baz: 42 }

Object.create()

  • 语法
    Object.create(proto, [propertiesObject])
  • 参数
    • proto : 必须。表示新建对象的原型对象,即该参数会被赋值到目标对象(即新对象,或说是最后返回的对象)的原型上。该参数可以是null, 对象, 函数的prototype属性 (创建空的对象时需传null , 否则会抛出TypeError异常)。
    • propertiesObject : 可选。 如果没有指定为 undefined,则是要添加到新创建对象的不可枚举(默认)属性(即其自身的属性,而不是原型链上的枚举属性)对象的属性描述符以及相应的属性名称。这些属性对应Object.defineProperties()的第二个参数。
  • 返回值
    在指定原型对象上添加新属性后的对象

框架偏爱

很多框架源码作者使用它来初始化一个新的对象,难道是最佳实践?
原因有二

  • 通过Object.create(null)创建出来的对象,没有任何属性,显示No properties。我们可以将其当成一个干净的 map 来使用,自主定义 toString,hasOwnProperty等方法,并且不必担心将原型链上的同名方法被覆盖。
  • {…}创建的对象,使用for in遍历对象的时候,会遍历原型链上的属性,带来性能上的损耗。使用Object.create(null)则不必再对其进行遍历了。
    两种方式的比较

案例说明

1)创建对象的方式不同

new Object() 通过构造函数来创建对象, 添加的属性是在自身实例下。
Object.create() es6创建对象的另一种方式,可以理解为继承一个对象, 添加的属性是在原型下。

1
2
3
4
5
6
7
8
9
10
11
12
13
// new Object() 方式创建
var a = { rep : 'apple' }
var b = new Object(a)
console.log(b) // {rep: "apple"}
console.log(b.__proto__) // {}
console.log(b.rep) // {rep: "apple"}

// Object.create() 方式创建
var a = { rep: 'apple' }
var b = Object.create(a)
console.log(b) // {}
console.log(b.__proto__) // {rep: "apple"}
console.log(b.rep) // {rep: "apple"}

Object.create()方法创建的对象时,属性是在原型下面的,也可以直接访问 b.rep // {rep: “apple”} ,
此时这个值不是吧b自身的,是它通过原型链proto来访问到b的值。

2)创建对象属性的性质不同

1
2
3
4
5
6
7
8
9
10
11
12
13
14
15
16
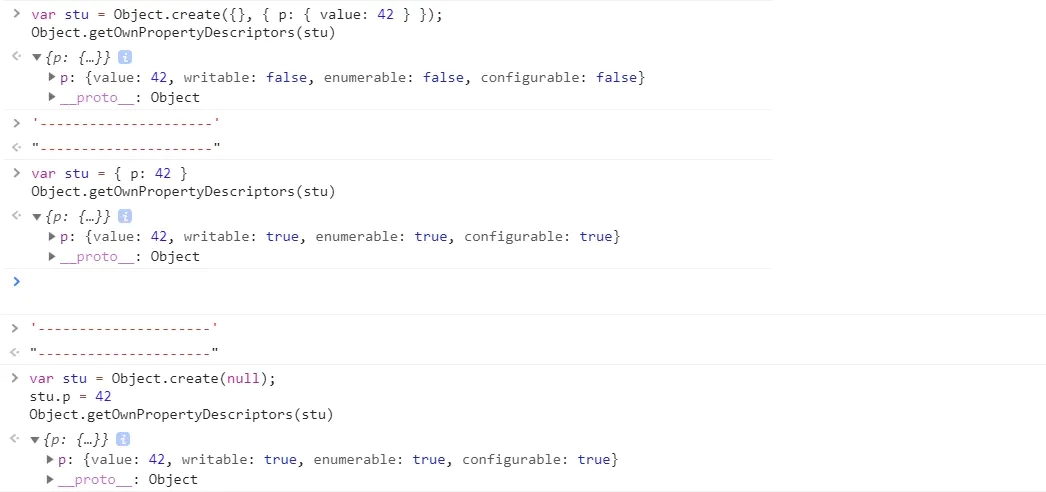
// 创建一个以另一个空对象为原型,且拥有一个属性p的对象
o = Object.create({}, { p: { value: 42 } })

// 省略了的属性特性默认为false,所以属性p是不可写,不可枚举,不可配置的:
o.p = 24
o.p
//42

o.q = 12
for (var prop in o) {
console.log(prop)
}
//"q"

delete o.p
//false

Object.create() 用第二个参数来创建非空对象的属性描述符默认是为false的,而构造函数或字面量方法创建的对象属性的描述符默认为true。看下图解析:

propertiesObject

3)创建空对象时不同

propertiesObject

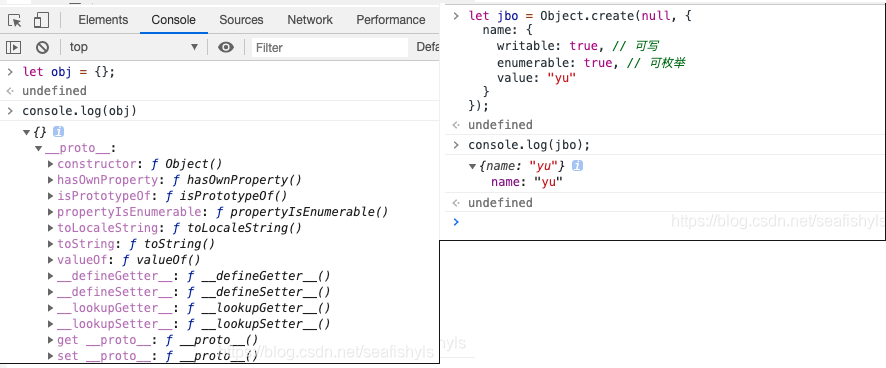
当用构造函数或对象字面量方法创建空对象时,对象时有原型属性的,即有_proto_;
当用Object.create()方法创建空对象时,对象是没有原型属性的。

1
2
Object.create()   //Object prototype may only be an Object or null
Object.create('') //Object prototype may only be an Object or null

4)proto 属性

JavaScript 的对象继承是通过原型链实现的。ES6 提供了更多原型对象的操作方法。
__proto__属性,用来读取或设置当前对象的prototype对象。目前只有浏览器环境必须部署有这个属性,其他运行环境不一定要部署,因此不建议使用这个属性,而是使用下面这些来 **Object.setPrototypeOf()(写操作,它是 ES6 正式推荐的设置原型对象的方法)、Object.getPrototypeOf()(读操作)、Object.create()**(生成操作)代替。

应用案例,原型属性的继承
1
2
3
4
5
6
7
8
9
10
var triangle = {a: 1, b: 2, c: 3};

function ColoredTriangle() {
this.color = 'red';
}

//ColoredTriangle.prototype = triangle; //ColoredTriangle.prototype.constructor === ColoredTriangle// false
Object.assign(ColoredTriangle.prototype, triangle) //ColoredTriangle.prototype.constructor === ColoredTriangle// true

var c = new ColoredTriangle();

打印出 实例c 看看结构是怎样的

propertiesObject

其中 color 属性在实例上,而其他的原型上。
现在来拷贝一个 实例 c2

1
2
3
var c2 = Object.assign({},c)
console.log(c2.color); //red
console.log(c2.a); //undefined

因为 Object.assign 是不能拷贝到继承或原型上的方法的。所以 实例c2 没有 a 这个属性。那要怎么要才能拷贝到原型上的方法呢?

  • 第一种方法
1
2
3
4
5
6
7
var originProto = Object.getPrototypeOf(c);
var originProto2 = Object.create(originProto);
var c2 = Object.assign(originProto2, c);
//var c2 = Object.assign(Object.create(Object.getPrototypeOf(c)), c)

console.log(c2.color); // red
console.log(c2.a); // 1

这样就实现了原型属性的拷贝。
Object.getPrototypeOf(c) 既 originProto 得到的是原型上的 //{a: 1, b: 2, c: 3};
Object.create(originProto) 既 originProto2 既是创建了一个 {a: 1, b: 2, c: 3} 在原型上的新对象;
Object.assign(originProto2, c) 在源对象originProto2 上合并对象 c (只能合并实例属性);

  • 第二种方法(推荐)
1
2
3
4
5
var c = new ColoredTriangle();
var c2 = Object.create(Object.getPrototypeOf(c), Object.getOwnPropertyDescriptors(c));

console.log(c2.color); // red
console.log(c2.a); // 1

可以把Object.create()的参数理解为:第一个参数是放在新对象的原型上的,第二个参数是放在新对象的实例上的。
Object.getPrototypeOf() 得到的是 c 对象的原型,然后作为第一个参数,所以会在新对象c2 的原型上。
Object.getOwnPropertyDescriptors() 得到是 c 对象自身的可枚举属性,作为第二个参数,放在 c2 的实例上。

为什么说推荐这个方法呢?因为Object.assign() 方法不能正确拷贝 get ,set 属性。

class 重难点

基本语法

1
2
3
4
5
6
7
8
9
10
11
12
13
14
15
16
17
18
19
20
21
class Point {
bar = 'hello'; // 实例属性
baz = 'world'; // 实例属性
constructor(x, y) {
this.x = x;
this.y = y;
}
get prop() {
return 'getter';
}
set prop(value) {
console.log('setter: '+value);
}
static myStaticProp = 42; // 提案,暂未实现
static classMethod() {
return 'hello';
}
toString() {
return '(' + this.x + ', ' + this.y + ')';
}
}
  • constructor注意点
    • constructor()方法是类的默认方法,通过new命令生成对象实例时,自动调用该方法。(可以用来绑定this)
    • 一个类必须有constructor()方法,如果没有显式定义,一个空的constructor()方法会被默认添加。
    • constructor()方法默认返回实例对象(即this)
  • 类必须使用new调用,否则会报错
  • get set方法设置的属性为prototype上的属性
  • static 可以设置静态方法 只能由原型调用,实例无法调用,可以被子类继承
  • 实例属性可以写在class顶部
  • 静态属性 暂时只可以 Point.prop设置 (已有提案,和静态方法类似)
  • 私有属性和方法有提案,在属性和方法前面 + #
  • 拥有新特性 new target (用于ES5构造函数),如果构造函数不是通过new命令或Reflect.construct()调用的,new.target会返回undefined

class的继承

1
2
3
4
5
6
7
8
9
10
class ColorPoint extends Point {
constructor(x, y, color) {
super(x, y); // 调用父类的constructor(x, y),必须放在首行
this.color = color;
}

toString() {
return this.color + ' ' + super.toString(); // 调用父类的toString()
}
}
  • super在constructor的作用
    • 子类必须在constructor方法中调用super方法,否则新建实例时会报错,这是因为子类自己的this对象,必须先通过父类的构造函数完成塑造,得到与父类同样的实例属性和方法,然后再对其进行加工,加上子类自己的实例属性和方法。如果不调用super方法,子类就得不到this对象。
    • ES5 的继承,实质是先创造子类的实例对象this,然后再将父类的方法添加到this上面(Parent.apply(this))。ES6 的继承机制完全不同,实质是先将父类实例对象的属性和方法,加到this上面(所以必须先调用super方法),然后再用子类的构造函数修改this
    • 在子类的构造函数中,只有调用super之后,才可以使用this关键字,否则会报错。这是因为子类实例的构建,基于父类实例,只有super方法才能调用父类实例。

super 关键字

除了上面的注意事项,super 还有其它用法

作为函数使用

1
2
3
4
5
6
7
class A {}

class B extends A {
constructor() {
super();
}
}
  • super() 在这里相当于 A.prototype.constructor.call(this)
  • 作为函数时,super()只能用在子类的构造函数之中,用在其他地方就会报错

作为对象使用

在普通方法中,指向父类的原型对象

1
2
3
4
5
6
7
8
9
10
11
12
13
14
class A {
p() {
return 2;
}
}

class B extends A {
constructor() {
super();
console.log(super.p()); // 2
}
}

let b = new B();

要点

  • super在普通方法之中,指向A.prototype,所以super.p()就相当于A.prototype.p()
  • 在子类普通方法中通过super调用父类的方法时,方法内部的this指向当前的子类实例。
1
2
3
4
5
6
7
8
9
10
11
12
13
14
15
16
17
18
19
20
21
class A {
constructor() {
this.x = 1;
}
print() {
console.log(this.x);
}
}

class B extends A {
constructor() {
super();
this.x = 2;
}
m() {
super.print();
}
}

let b = new B();
b.m() // 2
  • 如果通过super对某个属性赋值,这时super就是子类this,赋值的属性会变成子类实例的属性

在静态方法中,指向父类

1
2
3
4
5
6
7
8
9
10
11
12
13
14
15
16
17
18
19
20
21
22
23
24
class Parent {
static myMethod(msg) {
console.log('static', msg);
}

myMethod(msg) {
console.log('instance', msg);
}
}

class Child extends Parent {
static myMethod(msg) {
super.myMethod(msg); // 静态方法 指向父类
}

myMethod(msg) {
super.myMethod(msg); // 普通方法 指向父类.prototype
}
}

Child.myMethod(1); // static 1

var child = new Child();
child.myMethod(2); // instance 2
  • super在静态方法之中指向父类,在普通方法之中指向父类的原型对象
  • 在子类的静态方法中通过super调用父类的方法时,方法内部的this指向当前的子类,而不是子类的实例
1
2
3
4
5
6
7
8
9
10
11
12
13
14
15
16
17
18
19
20
21
class A {
constructor() {
this.x = 1;
}
static print() {
console.log(this.x);
}
}

class B extends A {
constructor() {
super();
this.x = 2;
}
static m() {
super.print();
}
}

B.x = 3;
B.m() // 3

类的 prototype 属性和__proto__属性

1
2
3
4
5
6
7
8
class A {
}

class B extends A {
}

B.__proto__ === A // true
B.prototype.__proto__ === A.prototype // true

上面代码中,子类B的__proto__属性指向父类A,子类B的prototype属性的__proto__属性指向父类A的prototype属性。

这样的结果是因为,类的继承是按照下面的模式实现的。

1
2
3
4
5
6
7
8
9
10
11
12
13
class A {
}

class B {
}

// B 的实例继承 A 的实例
Object.setPrototypeOf(B.prototype, A.prototype);

// B 继承 A 的静态属性
Object.setPrototypeOf(B, A);

const b = new B();

ES6允许继承原生构造函数定义子类

1
2
3
4
5
6
7
8
9
10
11
12
class MyArray extends Array {
constructor(...args) {
super(...args);
}
}

var arr = new MyArray();
arr[0] = 12;
arr.length // 1

arr.length = 0;
arr[0] // undefined

方法 不可枚举属性 继承属性 symbol属性 自身属性
for…in / in
Object.keys()、Object.values()、Object.entries()
Object.getOwnPropertyNames()
Object.getOwnPropertySymbols(obj)
Reflect.ownKeys(obj)
JSON.stringfy()
Object.assign()
… 扩展运算符
Object.getOwnPropertyDescriptors

markdown 基本使用

markdown 基本使用

标题

使用 # 号可表示 1-6 级标题,一级标题对应一个 # 号,二级标题对应两个 # 号,以此类推。

1
2
3
4
5
6
# 一级标题
## 二级标题
### 三级标题
#### 四级标题
##### 五级标题
###### 六级标题

效果展示

段落

Markdown 段落没有特殊的格式,直接编写文字就好,段落的换行是使用两个以上空格加上回车。

效果展示

字体

Markdown 可以使用以下几种字体:

1
2
3
4
5
6
*斜体文本*
_斜体文本_
**粗体文本**
__粗体文本__
***粗斜体文本***
___粗斜体文本___

效果展示

分隔线

你可以在一行中用三个以上的星号、减号、底线来建立一个分隔线,行内不能有其他东西。你也可以在星号或是减号中间插入空格。下面每种写法都可以建立分隔线:

1
2
3
4
5
***
* * *
*****
- - -
----------

效果展示

删除线

如果段落上的文字要添加删除线,只需要在文字的两端加上两个波浪线 ~~ 即可,实例如下:

1
2
3
RUNOOB.COM
GOOGLE.COM
~~BAIDU.COM~~

效果展示

下划线

下划线可以通过 HTML 的 标签来实现:

带下划线文本
效果展示

脚注

脚注是对文本的补充说明。

Markdown 脚注的格式如下:

[^要注明的文本]
以下实例演示了脚注的用法:

创建脚注格式类似这样 [^RUNOOB]。

[^RUNOOB]: 菜鸟教程 – 学的不仅是技术,更是梦想!!!
效果展示

0%